Followers

Tuesday 29 January 2019

Nellie in the flowers

Good morning all. I am glad you could pop in again today. It's cold innit! We have a sprinkle of the white stuff outside....it just looks like someone has been out with the icing sugar and given everywhere a dusting! I don't have much planned for today as I have plenty of secret stuff to do so it's all about staying safe and warm today. 
Did you read Barbara Gray's blog yesterday? It featured a card made by Barbara Lancaster using the elephant stencil! I think it's a brilliant stencil and I have used it a lot! And at the moment its on offer over at Claritystamp...well for a couple more days it is! 
So I thought I would show you one of my creations using the stencil and using the same flower stamps as I used on yesterdays blog. 
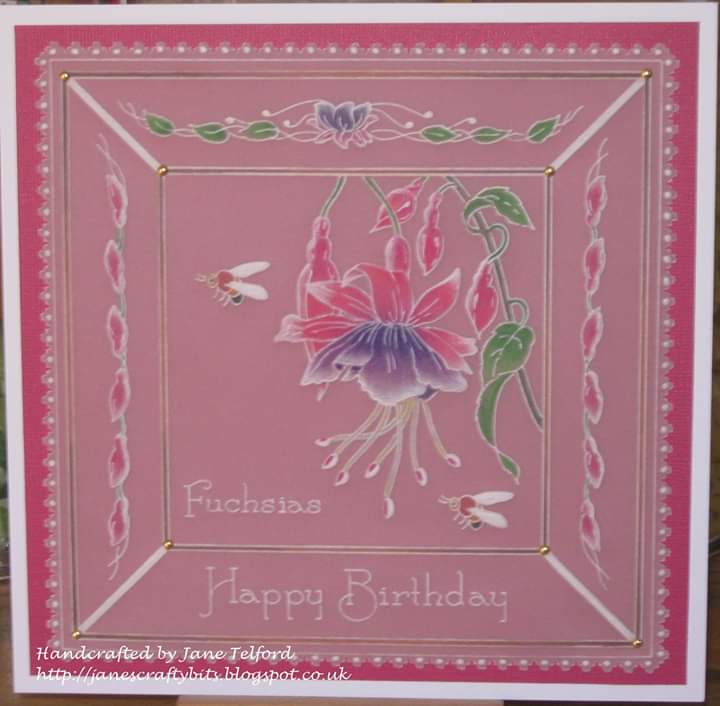
Here is the card and below are the usual ingredients and instructions should you decide to have a go!


Ingredients.
Artistry inks (Selection of bright colours)
Pergamano Blending pen PER-AC-70303-XX
Black fine liner pen
Sparkle pen
Black Sharpie Pen

1. Working on 7x7 stencil card attach the elephant stencil near the bottom of the card using low tack tape to keep it in position. Brush yellow ink into areas of the stencil then pink then blue overlapping the colours. Finally without adding more ink brush over with the yellow to ensure all the shape is covered. Remove the stencil and edge the shape with a fine liner.
2. Stamp the birds and dragonflies on in place. Stamp a selection of flowers at the base of the card over the stencilled elephant then use the solid stamps to fill in the colour on the flowers. Stamp the stems and leaves.
3. Using a blender pen and nibs add colour to the birds, dragonflies and leaves using artistry ink and water to help blend.
4. Edge the card with black sharpie pen and attach to a card blank. Add sparkle pen to the dragonflies' wings.

Hope you have a great day whatever you decide on doing. Stay safe and warm.
Happy Crafting 

Monday 28 January 2019

Hello Flower!


Good morning all! It's a bright sunny day here today but very cold. I don't mind that as you can wrap up to stay warm to venture out! I need to go to the post office this morning with secret stuff so I need to be quick with this one today.
I thought I would share a sample I did using Tina's Doodle flowers stamps. They are fab and can be used in a number of ways.
Here is the card and I have included the ingredients and instructions below. 


Ingredients.
Artistry inks ( brown and blue)
Promarkers
Sparkle pen ( Clear)
Black Sharpie Pen


1. Cut a piece of stencil card to 12cmx17cm. Attach the vase into position masking off the others around it with low tack tape. Drag brown ink into the vase shape leaving the centre lighter. Use a piece of card to mask off the main part of the vase to darken the base. Stamp a pattern in the same ink using one of the patterned circle stamps. Remove the stencil.

2. Add the inny part of the stencil over the vase and hold in place with lowtack tape . Brush brown ink below the tape to create a table top. Make the ink darker around the vase to create a shadow.

3. VERY Lightly brush blue ink around the top of the card leaving the centre white. I used what I had on my brush without adding more ink.

4. Keeping the inny stencil in place Stamp the flowers, stems and leaves. Now remove the stencil and add one more leaf . Add the tiny dragon flies.

5. Colour the flowers leaves and dragon flies with promarkers. Add sparkle pen to the dragonflies.

6. Edge with a black sharpie pen and mount on a card blank.

I hope you like todays project and if you have a go at it please share it on the Clarity Worldwide face book page but adding where you found the inspiration.

Happy Crafting 


Saturday 26 January 2019

Baby Jane


Hello all and welcome to my blog again!
I have had to have a break from doing my blog for a couple of days as I had other things I needed to prioritise but I hope you won't mind that! It's been a great week as far as Clarity is concerned and a busy month a head too and January isn't over yet!
Colin has been sorting out some paperwork and putting our new shredder to good use. It's one of those that almost minces the paper up so no chance of anyone getting out personal details from our discarded post! He has found lots of interesting things in with our pile of paperwork including baby pictures of me and my brother. The only difference in them is that mine are black and white and Andrew's are in colour! He also found a photo of my mum when she was 10. So lovely. I want to get a frame for that one. 
Anyway my baby phot was sitting on the table when I started to do my samples for Paul's show using the fabulous plates designed by Linda Williams. So it gave me the idea to turn one of the plates into a frame. I scanned my picture in to my PC and then printed it out to the size I wanted 
Here is the finished card with the instructions as usual below.


Ingredients.

Linda's New arrival plate - Bottles and rattle GRO-CN-41162-03

Mini semi circle perforating tool  PER-TO-70034-XX

Perga Colours exclusive

White blendable pencil

Dorso oil

Baby Photo

ribbon


1. On plain parchment emboss the bottom part of the plate up to the bottles then extend the lines to fit the photo and emboss the ribbons and bows to create the frame for the picture.
2. Emboss whitework as shown on the design.
3. Add colour to the reverse using the Perga colours. Use a white pencil to colour the bottles and blend with dorso oil.
4. Semi perforate with the mini semi circle tool around the 3 straight sides. Emboss a semi circle in each one then reperforate. Perforate around the scallops and inside the frame with the bold 2 needle tool. Cut away waste.
5. Position the picture in the frame and attach with a tiny dot of Perga glue.
6. Attach to a piece of glitter card with brads and red liner tape behind the photo. Mount on a card blank. Add a ribbon to the front.

 You could easily change the colour to blue for a boy. 
Please let me know what you think by leaving a quick message below. 
Have a great day what ever to get up to.
Happy Crafting

Tuesday 22 January 2019

Snow good!!!

Good morning to you. Bit snowy today which makes me glad I don't need to go out too far. Even Charlie wasn't keen to go outside!
I have got plenty to keep me busy indoors! It should have been the jjammma meet up in Stockport today but as Louise is on Hochanda today and others couldn't come it has been cancelled... Maybe a blessing in disguise as its not fit to go out especially for those who have a fair way to travel. 
Anyway today's artwork I want to share is a card I made for a friend's birthday. As she's received it I am OK to share it now! 


I wanted to use the Teddy stamp (he's so cute) that we got with the claritystamp stamp club and so stamped him in the centre of stencil card. I then created a mask for him. I attached a stencil to the card and sprayed with pink and purple dyllusion ink sprays. They are so vibrant! I removed the stencil and mask and coloured the bear with promarkers. The word chains were used as the sentiment. I think went round the stencil outline with a fine liner and wiggly line and around the card with a black sharpie before adding to a card blank.

Anyway that's enough from me today. 
Stay warm and safe. 
Happy crafting 

Monday 21 January 2019

My tribute to Jayne Nesterenko

Good evening to you all.
It's two years since the very lovely and very talented Jayne Nesterenko lost her fight to a very cruel illness.
This is my little tribute to her using stamps and groovi plates. 


Jayne really did have a fantastic eye for detail. 
I hope you liked the artwork I did with her designs. 
Happy crafting. 


Sunday 20 January 2019

A very inky day

Good evening all. I didn't think I'd make it today but thought I'd just pop in to say what a tremendously fun day I've had. Maria had come up with a great idea for the workshop and it really went down so well with everyone. I'm not going to give away what it was because I'm not sure if she's still got other workshops with this to do! But I had a brill day.
I will show you a picture of part of the table I was on. It never ceases to amaze me how no matter how much space we start with we end up working in a space the size of a postage stamp.


Anyway I'm tired and need to get stuff put away. 
Have a nice evening. 
Happy crafting 

Saturday 19 January 2019

Blackbird's song

Good morning all. Lots to do again today including packing my crafty stuff ready for Maria's workshop in Preston tomorrow. I love going. It's a day which is filled with inspiration and lots of fun. I get to craft all day with my friends so we have lots of chat too! 

I also want to wish a lovely lady a very happy birthday today ! Dawn if you read this, I mean you! xxx

The artwork I am sharing today is the last one from Maria's shows last Wednesday. On the face of it you think its just the plate grooved out as it is but I have actually made it bigger to fill an A5 card. I also picked out a little bird from the other plate and added music notes to make him sing! Maybe he's singing Happy Birthday to Dawn! xx

Here's the card and below you will find the instructions if you fancy having a go at it!


Ingredients.

Nested rectangle plate GRO-PA-40524-04

Be still and listen plate GRO-WO-40271-02

The Earth has Music plate GRO-WO-40270-02

Perga colours

Northern Lights Papers


1. On Plain parchment  Create a frame using the 2nd & 3rd rectangles.
2. Position the words in the centre of the frame and emboss the letters only NOT the frame around it. Fill in the gaps by moving the plate around and just finding a line that helps you.
3. Use the rectangle plate to emboss a frame around the words and then fill the frame with squares using the lines on the rectangle plate to get it even.
4. Fill the bottom section with flowers and the add the birds to the top section. Add a small bird from the other plate to the top of the flowers.
5. Add white feathers to the wings of the birds by embossing them free hand.
6 Add colour to the reverse using Perga colours. Use the fine end of the pen to add music notes on the front.
7. Perforate and cut waste from around the edge. Attach to a piece of designer paper using brads then mount on a card blank. 

Anyway I am off to do some crafting 
Have a great day whatever you do. If you can take a few moments to write a comment I love to read them.

Happy crafting 


Friday 18 January 2019

A Lone Hare

Good morning all. I need to be quick today as I really have a lot to do ranging from housework to cutting Colin's hair and then a lot of secret stuff needs doing! So I wont waffle on.
Here is another one of the samples I made using the new plates on Maria's shows on Wednesday with a brief method of making for those who fancy having a go once you get your plates. 


Ingredients.

The Earth has Music plate GRO-WO-40270-02

Nested square plate GRO-PA-40037-03

Nested Circle plate GRO-PA-40051-03

Groovi Go Mate and alphabet GRO-MA-40748-18

Tina's Doodle flower plates 1& 2 GRO-FL-40806-02

Semi square tool


1. On Plain parchment  emboss  a circle (6th) and then the square around it using the 5th and 7th square.
2. Emboss the centre hare at the bottom of the circle. Add the stars from the Groovi Go mate. Use the lines from the flower doodle plates to make the hills ignoring the dots the squiggles. Emboss the words in the frame.
3.Emboss whitework in the stars and the tail. Add colour on the reverse using promarkers.
4. Semi perforate around the frame with the semi square tool. Emboss the V shapes in the edge then re perforate. Perforate in the space created by the circle in the square frame. Cut waste from in the edge and the corners.
5 Attach to a piece of blue pearlescent card by stitching it on with fine white thread. Mount on a card blank.

Have a great day and let me know what you think of this please.

Happy Crafting


Thursday 17 January 2019

Hares on the Green

Hello and thank you for dropping in!
It's been really cold here today but bright blue sky and sunny so that makes you feel better. It reminds you that spring is on the way and although it's cold you can wrap up against that. It was pleasant to have a walk up to the post office this morning with some more secret stuff...soon to be revealed! 

And I have a date with my daughter to go shopping for wedding items! OOO its all getting very exciting!! I think the next 6 months will go very quickly! I really must get on with designing a card …. I have plenty of choice as far as stamps, stencils groovi and even dies!

The artwork I an sharing with you today is one of the samples I made for Maria's shows yesterday. Wasn't she brilliant? I do love her style and she's such a fab teacher. But more than that she's a good friend too!
Anyway the plates we had to work with were fabulous as always so it's not hard to end up with a good card! Even if I say so myself! 

This one was worked on green parchment and had a second layer of plain underneath it 
So here it is. 


Ingredients.

The Earth has Music plate GRO-WO-40270-02

Tina's Doodle flower plates 1& 2 GRO-FL-40806-02

Nested Scalloped Rectangle GRO-PA-40587-04

Sentiments Spacer (harmony) GRO-WO-40655-06

Diagonal Basic Groovi Border Piercing Grid GRO-GG-40383-14

Green and plain parchment

1. On green parchment  emboss  the Earth has music plate but leave out the words. In the space where the words would go, emboss the sentiment and then fill in with flowers, leaves and dragonflies from the doodle flower plates.
2. Emboss white work to the flowers  and tails of the hares. Fill the hares and the birds with dots using the diagonal plate.
3. Perforate around the edge and cut away waste. Put to one side.
4 On plain parchment and using the scalloped rectangle create a frame to fit the green piece. Perforate and cut away the waste.
5. Layer up the plain and green parchment and then attach to a piece of green card using white brads. Mount on a card blank.

Anyway enough of my drivel. Please feel free to leave a comment . I like to know what you think of my artwork!

Have a great evening 

Happy Crafting


Wednesday 16 January 2019

An experiment!

Hi everyone and welcome to another blog!
It's our shopping day on a Wednesday so I was up and out early. I'm so glad that Asda has an undercover carpark as the weather is not at all good today. It's wet and going really cold... Need the thermals on again. I just hope that the rain doesn't turn to snow! When we got back I had a bit of admin to sort out and photos to take so I could get some samples packaged up. They need to go in the post tomorrow. 
I got my PTCs done yesterday but I've not attempted the icing sunflowers...I realised I didn't have the right icing to do them. So that's something I need to do. 
So I had a play with a technique that Eileen Godwin had highlighted. Eileen had seen it on a you tube channel called Treasures of many by a girl called Natalie. Its a brilliant channel and her videos are so easy to follow.I also found other you tube videos of it including one by Tim Holtz. It's using oxide inks on shiny card. I have to say that Natalie's technique of using the baby wipe is genius. So I thought I'd have a bit of a play and use the same colours on different types of shiny card. 
Very interesting! !! I used fossilised Amber, festive berries and salty ocean for the inks and the card I used was the clarity coated card, chromo card that clarity also sell and some bog standard photo card. 
You must dry the surface in between each addition of ink. And once all the colour is on the card use a baby wipe to reveal the final colour and bring back the shine. 
Here are the results! 
 I was amazed at how the ink reacted so differently on each type of card. I have now got 3 lovely backgrounds to use another time! 
Anyway I'm off to play some more! 
Have a great day whatever you're doing! 
Happy crafting. 

Tuesday 15 January 2019

I've got Sunflowers on my mind!

Hello all! Thank you for dropping in again! Today I am getting a few jobs done then later I have my PTC swap to sort out! I have a few ideas floating round in my head but once I get playing all that can change! My groovi stuff usually does that.... I start off with a basic plan in my head then it evolves and the more you play with the plates the different possibilities emerge. 
What's a PTC? I here you ask. Well it's the parchment equivalent of an ATC or artists trading cards. They are small pieces of beautiful art work that were traditionally swapped instead of a business card. SO a PTC is 3.5inches x 2.5 inches. You can also do a round one 2.5 inches in diameter which is known as a coin. So they are great to practice your skills on and also to use up small pieces of parchment that us crafters just cannot throw away! Whatever happens I will have some fun doing them. I just hope my partner in the first swap will like what I do! 
You can find details of the swap on the Facebook page Groovi Worldwide. Josie Davidson designed some great plates to help with these and she is organising the monthly swaps.

I also want to have a go at making some sunflowers out of icing. I have seen the most beautiful wedding cakes with sunflowers on them and if I can get the flowers anything like those I will be happy! I am sure once I get playing I will be able to do them. I just need to get the colours right! 

The artwork I want to share with you today is one I made back in October using the Hidden Hares plates. It's not a PTC but it's still an easy one to do. I used  the Hares in the Meadow plate for this one. 


Ingredients.
Hare In a Meadow plate GRO-AN-41108-03
Nested square extension plate GRO-WO-40538-15
Pots and Vases Baby Plate GRO-FL-40217-01
Semi Square Perforating tool
Brighton Rock Designer Paper


1. Working on plain parchment emboss the double lined frame which is the 9th and 10th squares on the plates. Emboss the three plant pots and flowers . Emboss the bird.

2. On the reverse add colour with blendable pencils.
3.Semi - Perforate around the frame with the semi square tool. Emboss a zigzag in the perforations then re perforate. Cut waste from around the edge and within the perforations.
4Attach to a  piece of designer paper cut to a 14cm square with brads then attach to a 6x6 card blank.

Hope you have a great day whatever you get up to.
If you like todays artwork please leave me a comment below!
Happy crafting. 


Monday 14 January 2019

Owl be seeing you!

Good morning to you! 
At least for the moment it has stopped raining although for how long I am not sure. It would be nice to have a bit of brightness now! I am not wanting hot sunshine....just a bit of warmth! 
I had a really productive day yesterday and certainly my hands looked as though they had been spending a day crafting....I had paint and ink out so you can appreciate things got messy! Ace!

I thought I would share something a bit different today. This was done when the 3 way overlay stamps came out for the first time! They are really an innovation and since that first set we have had a lovely collection of this style of stamps! and as a bonus there is usually a stencil to match too! 

I used the fossil leaf stamp and stencil set for this project. Well I actually used the stencil only for this.


I had bought this MDF shape ages ago and can't actually remember where it came from. 
I painted it with gesso and let it dry.
I wanted the surface to look like feathers so I used the stencil on different areas of the owl adding texture paste through the stencil and drying it as I went with a heat tool. You need to use a less fierce tool or the texture paste bubble!
Once I had covered the surface I left it overnight to dry properly. 
I used acrylic paint to add colour and dry brushed with inkagold over some areas.
I drew onto a card the area where the eyes and beak were and then coloured these with promarkers. This was stuck on the back so you could see the eyes and beak  through the holes in the MDF shape.
I added flowers to the owl and that was it finished

Have a great day whatever you are doing and  please let me know what you think of the owl by leaving a comment here.

Happy Crafting 


Sunday 13 January 2019

We want it in Stamps!!! PLEASE!!!!

Good morning all. Well the weather is awful today! Wet, wild and windy! It certainly isn't the day to venture out very far!
As most of you know ( and if you didn't you do now) when I joined Barbara's fantastic design team it was as a stamper. I loved to use the brayer and other methods to create cards using stamps and then stencils. I had had no intention of ever doing parchment....but that's another story! 
When I get my groovi plates I still look at them through a stampers eyes....if this were a stamp what would I do with it? is the question I often ask myself. So when a stamper sees a great design done only in groovi they appreciate its beauty but wish they could have it in stamp form too. Now nearly always  the designs are coming out in all forms that Clarity produce. Stamps , Stencils, Groovi and Dies. This means everything can match which appeals to my OCD side. 
I wanted to do a full dream catcher but the stamp I was using is a half circle one. In groovi it's easy to pick out the bits you want and avoid the bits you don't. But in stamping its a bit more difficult and takes a bit of thought! But it can be done with masking techniques and here is the artwork I did with it. As you can also see the gems can be done on card as well as on parchment.


Ingredients.
Tina's Henna Dream catcher set
Dream Wordchain 5  - ST-WO-10052-XX
Perga Liners (blendable pencils) PER-CO-70063-XX


1. Working on Theuva card trim to 9½cm x 19cm then mask the dangles off the stamp and the central line. Ink the stamp up then remove the masking and stamp so the curved edge is up.  Mask just the centre line now , ink up the stamp remove the mask and stamp so they join and make a circular shape. Use a fine liner to disguise the central lines.

2. Stamp the border top and bottom and add the word.

3. Using the blendable pencils colour the gem adding highlights with a white pen. Colour in the rest of the image as shown.

4. Mat onto black card and then mount onto a card blank.

I hope you have a great day whatever you are doing. Please let me know what you think of todays artwork by leaving a comment below.
Happy Crafting 


Saturday 12 January 2019

A gem of a circle

Good morning all. It's another cold and grey day here ...one of those days where it never really gets properly light. It's not raining but it just feels damp! I do hope it picks up a bit. It would be nice to see a bit of brightness! 
So today I will have to make my own sunshine and have a play with some inky stuff. I might even get the paints out. I have put away the groovi stuff for now as I need some messy play time. I think those of you who are stampers but who have found parchment art through Groovi will understand exactly where I am coming from there. Don't get me wrong though... I love doing the parchment art but every now and again I need messy play!

That said the piece of artwork I want to share with you today is a piece of groovi artwork. It uses the Henna Dreamcatcher plate and the Henna Droplets plate both designed by Tina Cox. I also used my favourite perforating tool to create the edge


Here is a list of the things I used and what I did.


Ingredients.
Nested Square GRO-PA-40037-03
Semi square Tool PER-TO-70021-XX
Perga Liners (blendable pencils) PER-CO-70063-XX

1. Working on Plain parchment emboss the half circle but leave out the dangles and also the straight edge line. Turn the parchment and line up the half circle to be able to emboss a full circle.
2. Emboss the two largest squares around the circle so it is evenly in the centre. Use the droplet plate to add the corner details.
3. Emboss white work to the design as shown. On the reverse add colour but not to the centre circle. On the frame blend the colours with dorso oil to get a smooth effect.
4. On the front using the blendable pencils create a gem and finish with white pen/ink
5. Perforate in the corner detail with a bold 2 needle tool and around the frame with the semi square.  Cut away waste.
6. Mat onto blue card using brads then attach onto a card blank.


I hope you like todays card and if so please leave me a comment here. 
Happy crafting 


xxx