Followers

Friday 28 December 2012

Happy Holidays

 
Well I thought it was about time I came on my blog and said Hi to you all!

It has been a very busy and stressful term at school so these holidays are a time for me to relax and enjoy some well desreved me time.
 
I have managed to get a bit of crafting in but mainly at organised weekends when things have been planned but that has been good for me as it has developed my skills and pushed my creativity to the nth degree which has to be a good thing.
 
I was thrilled that just before Christmas I finally won the Clarity Challenge Here is the card I won with.

 
I was even more thrilled when Barbara contacted me to ask if she could use it as the Clarity Christmas E card that went out to her customers....Like I would say no!
 
Anyway I had better go and get my trifle finished! Off to see my brother and his family to day and I am taking the pudding!
 
See you all soon
 
Happy Crafting
 
Jane xx

Saturday 29 September 2012

A little bit Indigo Blu!

Well I cannot believe just how busy its been at the beginning of term! I knew it was going to be a busy start but WOW! What with new heavy timetable...new subjects for me to teach...open evening and then OFSTED arrived!
But all is OK and I can breathe a bit now!

So yesterday I decided to have an evening doing what I like and did a couple of cards using the Indigo blu Stamps...oh and I used one of Sheena Douglass's new stamps to add a few bits to it too.


The first one I stamped the tree in versamark then used winter wonderland embossing powder so it was white but with a bit of sparkle. I made sure I used the anti static bag on the black card adn it did pay off! I used the versamark pen to add a few dots and swirls then matted it on to some red card then onto some green and red backing paper. Here is the result...


The second on I embossed in green embossing powder then I stamped the corners with versamark using the border stamp in the Sheena Douglass snowflake stamps set. I then used pan pastels round the edges. I mounted this onto some silver holographic card
Once I had done the topper I stamped the base card with the Indigo Blu script stamp (which is great for backgrounds) just randomly with versamark and I added a few bits of the snowflake border then went over it with green and turquoise pan pastels. Here is the finished card...


Hope you are having a crafty weekend
 
Love
Jane xx

Sunday 2 September 2012

Clarity Weekend

Well as it is the Clarity weekend...when Barbara Gray does the Classroom show and her regular monthly show on Create and craft I thought I would show you my 2 cards that I have done for the last 2 clarity challenges

The first on is the Sports themed one. It had to say sports but could not have the olympic rings on it. It also had to be in red white and blue!

 
I drew the flame and cut it out of paper to make a stencil which I then stencilled onto card using pan pastels. I also used Pan Pastels to create the background and the SpOrt stamp. Then I stamped the sports icons in red and blue onto a piece of white card then assembled it all together!
 
 
The Second Card had to have a stamp, a bird and a tree on it and had to use shrink plastic somewhere in it.
I hadn't used the wire tree before so I wanted to incorporate this somewhere in the design and had considered using this on shrink plastic...but then I had a dream and this is the card I dreamt...My bird is the Kingfisher done in shrink plastic....It looked quite cute I thought. I like doing the stamp stamps and thought that the flower stamps would look good in them. The idea was that the flower stamps were the garden around the tree....yes I do have weird dreams. The backing paper was done with the stamp we got from the New design stamp club. I really useful stamp.


Well there you go!
 
Hope you have had a good crafty weekend
 
See you all soon
 
Jane xx

Thursday 30 August 2012

My Addiction!!

Now those of you who know me will be aware that I am addicted to stamping.
Yes I admit it..... I cannot pass a good stamp and I was looking for a particular stamp and found I had some stamps that I had still to explore so these are what I made following that discovery!

 
I used distress inks to do this and then Wow embossing powder for the plants at the front!
The backing was some spellbinders and M-bossibilities which I then rubbed with the ink blender to make it stand out a bit more.


I used distress ink again on this one and a bit of spritzing to get the background. Then the image and sentiment were stamped and embossed in black. The flowers and leaves were cut using memory box dies! And the backing is an M-Bossibility folder again once embossed it was rubbed over with ink to make the pattern 'pop'.

 
This last one saw me using my pan pastels to do the background. I used the pale tint blues and greens to create the background then stamped in brown adirondack to soften the image. I thought black would have been too harsh. I put the piece of peacock blue codinations card through an M-bossibilities folder and them sanded it to show up the pattern.
The borders are a spellbinders die and the flower I created by cutting and crumpling paper then putting it together with a brad. The borders are cut from brown card to tie everything together.
 
Well thats it for today!
 
Happy crafting
 
love and hugs
 
Jane xx


Time Flies....

...when we are having fun!!!
I cannot quite believe where the time has gone...it only seems a couple of days since I starting my summer break and now I have one more day of holiday left. Back to work on Monday! WOW! Where has that summer gone or have I been teleported into the future somehow!
Any way I thought you would like to see some of the stuff I have been doing over that time.

I started my holiday by having my anniversary card to make. Obviously I had to try and do it without Colin seeing it which is not easy as he has the knack of turning up when least expected but I managed it eventually! And with some days to spare! It was our Pearl anniversary this year so I wanted to make it special. Anyway here it is...Its an 8x8inch card and I used my slice, cricut and cuttlebug with spellbinders to make it!


I know he liked it...good job really!!!

I also was asked to make a wedding card. I had one for an engagement on Facebook which someone had seen and wanted me to do the same thing but for wedding! I never like doing exactly the same card but thats what she wanted so I had to oblige. She was happy with it anyway! Here it is.

 
Anyway thats all from me for the moment...Need to sort of some photos and then I'll be back.
 
Happy crafting
Jane xx


Friday 20 July 2012

Lovely day

Wednesday, the first day of my jollies went really well.

To start it off Sheena Douglass was on the telly at 8 o'clock am so I woke up just in time to turn the telly on and watch it in bed....how indulgent of me!
Loved the backgrounds she was creating and the cards made were fab! Hope mine look half as good when I get my stamps.

I then got ready to go out to Poynton Garden Centre where I was going to the workshop run by Jo Rice. Todays class was Fabulous Florals! There were no clues to what we would be doing til we got there.

Jo handed out an assortment of backing papers and showed us the magazine that we could get them from.

We were going to have a go at making flowers then using them to make a card or 2!

We all had a go at making a rose...mine was OK but I decided to make the other type of rose where you cut a spiral and then roll it up quilling style and then glue it so it stays together..I made 2 of these and used them in my first card.


The second card we could do whatever we wanted using our papers. Jo gave us a button to use and we had access to distress inks and stamps if we wanted. Here is the card I made


I had a thoroughly nice morning and stayed for a bit whilst Jo got set up for the afternoon and had a drink and a natter with her and Alex!
I of course went to have a look in the shop where they had some new Indigo Blu stamps in. I had to buy a set....the poppy! I will be making good use of this stamp set, I am certain!


It was a really great start to my holidays! Thank you Jo!

Hope you are having a crafty day

Love
Jane xx

Thursday 19 July 2012

Summer Hols Are here!

Well the summer hols have arrived so I am going to try and spend some time updating my blog.

I will start with a card I have done for a challenge on The Vintage Artisans fb page.

It has to be vintage and a bit of Steampunk
I felt totally out of my depth but enjoyed doing it.


The image was off Vince Price's blog where he has some lovely free digis on offer. Thank you Vince. They are really brill and so easy to colour.

The flowers and backing papers are off the free CD I got with Crafts Beautiful Magazine. Its Shabby Chic by Debbie Moore Designs.

The other embellishments are the cogs and sprockets spellbinders.

Hope you like it.

Have a lovely crafty day!
Jane xx

Tuesday 5 June 2012

My First ever demo

I was asked if I would do a demo of One Stroke painting/Paint Fusion techniques at H. G Crafts which is in the grounds of Poynton Garden Centre. I said I would and agreed to do the demo on Bank holiday Monday (June 4th) as part of the Jubilee Celebrations.

I spent some time gathering together some samples either by painting new things or by 'borrowing' back things I had painted and given to my friends and family as gifts. They were all quite happy to lend them to me as long as I looked after them and also gave them back after!!!

So the day arrived and I was nervous but in for a penny as they say!!

Sunday had been awful weather but when I opened the curtains it looked like it culd either be a lovely day or end up raining. As the demo was to be outside the shop I hoped it would stay dry at least.

I had packed all my things up on Sunday evening and so I could get set up I went off to get there for just before 10. That way I could drive the car to in front of the shop and unload before I had to park the car in the car park.

Pauline (who owns and runs the shop) helped me get set up with tables and a chair. So I set up my samples table and then my working table. Pauline also got a table arranged so that people could watch me then have a go themselves.
Here is a picture of my samples table.


Once all was set up it was nearly 11 so I sat down and got my paints out and straight away I had someone watching me! It was a little strange at first but me being me and able to talk to anyone I really enjoyed it!

It was lovely that some of my friends came along to support me. It made it much easier to do the demo I think.

I was a little taken aback when Maria Simms arrived to watch me. She is to me such an inspiration and to me she is a bit of a celeb in the crafting world and there she was to see me do my demo!!! OMG! But she is so nice and genuinely enjoyed it I think!
I had taken my sandwiches for my lunch but got so engrossed in what I was doing and had people there watching me all the time that I suddenly realised that I hadn't had time to eat them.

I hope it was OK for everyone who came and watched. I know a few people had a go for themselves and I hope that they continue to practice and enjoy it as I do!
notice the nails and hair!!


 I would love to do more now even though it was tiring it ws a nice kind of tired!

If you read this and did come to the demo please let me know truthfully how I did!

Have a crafty day!

Jane xx

Day out at the Clarity NW Workshop

On Sunday I went off with Jo and Rae to the Clarity NW workshop run by the lovely Maria Simms. She does the most amazing cards and I had been looking forward to it for ages.
It was pouring down as we set off and rained the whole way there ...and back for that matter!
I picked up Jo and we headed off to Rae's house then she took over in her car and drove us to Birkenhead where the workshop was. We went under the Mersey through the Birkenhead tunnel and I do hope that no one was filming us in Rae's car as she tried to use the device aimed at getting you through the toll more quickly.....in the end she managed to get it to work (with a bit of colourful language) but it would have been quicker the throw the coins in the basket!!!


We arrived in good time and it was lovely to see Maria again.


There were 9 ladies doing the workshop on Sunday some had obviously been before others like me were new to the group!


First job was to get the coffee made then when everyone was there and ready to start we were off on the day!
We had all been given a clarity stamp (which you will see in the photos) and our next job was to take the blue off it...this proved more difficult than it sounds! We got to take the stamp home at the end!

Then we were ready to do our first card.


Maria had given us all the card stock we would need and showed us the sample card. We had to use the brayer and resist technique using versamark pad and then cranberry over it. This piece of card was then cut into 3 pieces and matted onto a piece of black card.

We then stamped the image onto a piece of card and pulled some of the ink out using a damp paintbrush. This was then cut into a circle so that it could be mounted with the largest die cut over it.
I just love the die cuts we used...Spellbinders cogs and sprockets...I have added them to my wish list!


Here is the first card we made.


The clock was stamped and cut out and then when I got home I added the glaze to it.


The second card used the same stamp but using a more messy ink technique. I loved the lemonade adirondack that was used. We had used a coloured Archival Ink pad to stamp the image first I think it was Pale Ochre that we used!!


We then had to cut some cevrons from some brown card and used a versamark pad to stamp it. We then went round the edge with a fineliner to make faux stitching. I used a brown fineliner so it was not so harsh as black. I loved how the card then looked like leather.
Twine was added finish the card and here it is.


The next card saw us stamping out the same image 4 times and pulling out the ink again! We then had to cut out parts of the image as we were going to create a decoupage of the image.
We also created an apperture by embossing the card front. We then spritzed it with mica spray and cut out the central square for our apperture!
The decoupaged image was stuck onto some black card and this then attached to the back of the card so it could be seen through the apperture. Again I highlighted the watch face with glaze when I got home!


The final card was a real quick one.

We maked off the top and bottom of the blank card leaving a 2inch(approx) gap in the middle then used our stamp to stamp along the space we had created. We then used either a make up sponge, ink blender or brushes to blend ink to the edges. I used my new brushes and was well impressed with the result!

I finished it off at home with 2 wiggly lines top and bottom and 3 gems. It just needs a sentiment now but that can wait til I know who it's going to and for what!


All in all it was a great day out. Well worth the money and when you weigh it up it was excellent value!

Maria is such an inspiration and the cards we did could be done with so many different stamps and using different colours!
I certainly want to go again!


Hope you are all having a lovely crafty day

Jane xx


Sunday 6 May 2012

Three Cats and a Bird

I thought I would just pop on and put my April Clarity Challenge card on my blog.


It had to be using clarity stamps and have 3 cats and a bird. It also had to be black and white.


Here it is

Hope you are all having a lovely bank holiday weekend and doing lots of crafting!

See you all soon
Jane xx

Sunday 15 April 2012

Last day of the hols!!

I managed to get to play with my new stamps to create a lovely picture of the old mill and poppy fields


I did the picture and then set about making a card with it. 


Here is the Picture


I had a few ideas about what to do with the picture but finally decided to do an easel card. The outside was taken care of with one layer of a reddy brown colour that complimented the poppies and the browns in the picture.
The inside of the card posed more of a challenge! I could not find any suitable paper to use so I made my own using the stamps of the poppies. I also found a little stopper which is a chipboard  picture which was in a freebie of the Edwardian Lady designs but the poppy I thought matched the design perfectly!
The picture and the inside paper look as though they have been brayered but in fact I used a blusher brush to do it and distress inks!

It was fiddly to colour the poppies but so therapeutic! I was glad of having the fine nibs for my promarkers!

Here is the final card.
Please feel free to leave me any comments about the card and thank you for taking the time to look!
Have a lovely crafty time

Jane xx

Thursday 5 April 2012

Giant Cupcakes

I wanted to make Amy a birthday cake and I saw a giant cup cake Mould being sold on Create and Craft. Colin being Colin said he wanted to buy one and off he went to find one to buy on Ebay....promptly bought it and so it was ready for her birthday!!!


I made Amanda one for her 50th birthday first....here it is...it's just a plain sponge with vanilla cream but coloured bright pink. 


Colin then wanted one making as a coffee cake...and of course I had to have green on there somewhere! I found the most vivid lime green icing in Spreadborough's where I get all my cake supplies from and  here it is!...


After that one came Amy's birthday cake....chocolate of course and multicoloured.


Hope you enjoy the cake Amy...I am sure your friends will especially Hannah!!!

Please say hello if you pop in to read about my Giant Cupcakes and let me know which one you would like!!!

Jane xx

Monday 2 April 2012

Goodbye Brendan

Our Head of Maths left on Friday after working at School for 15 years. I know he will be missed by his staff but mainly the students who have lost an excellent teacher.


I wish him well ini his next venture whatever that may turn out to be.


Here is the card I made for him using some of the things I got in Harrogate.


I was quite pleased with it and found the flitterglu and gilding flakes lovely to use!

Please let me know what you think of it.

Have a lovely crafty day everyone
Jane xx

Clarity Challenge Card for this month

Here is the card I made for the challenge this month. It had to be yellow and white and use a clarity stamp!


I don't know if it got there in time as the challenge ended early for good reasons I may add. But at lease it will go to a good cause when it does get there!


I used some of the stamps I bought in Harrogate.


Please let me know what you think of it.


Off to post some more now!


Jane xx

Wednesday 21 March 2012

Trip To GNPE at Harrogate

On Sunday I went to the GNPE at Harrogate.
We had to make an early start as my friend and I were booked into one of the breakfast workshops with the lovely Barbara Gray!. So at 4.45 my alarm went off but unlike an early start in the week for work I was eager to jump out of bed and get ready.
It was a miserable morning, wet cold and obviously still dark but I decided on what to wear then got ready!
Having had breakfast and seen the dog out I just had to wait for my friend to arrive ...but I didn't have to wait long!
We loaded the car up with our empty bags and then Colin at the wheel we set off! ( He makes an excellent chauffeur!)


We got onto the motorway and the excitement began to build with every mile we travelled! Then we saw the sign....motorway closed junction 27-28.....oh no that's before we needed to get off....


At the next services we pulled in for pit stop and Colin being the cautious type bought a map of the Leeds Area just in case we needed it!!! He should have been a scout!


Then as we set off there was another sign saying that it was a night closure! So we may be OK!


We reached junction 27 and it had just reopened....Thankfully!
The extensive roadworks on the motorway though with a 50MPH had set us back a bit so we were glad we had set off early.

We got to Harrogate for 8.30 and Colin dropped us off at the door and said to phone him when we were ready! And the weather was brightening up for him to walk round Harrogate!


We were shown to where the workshops were taking place and got our seats. With coffee and muffins to welcome us too it was now turning out to be a lovely day.


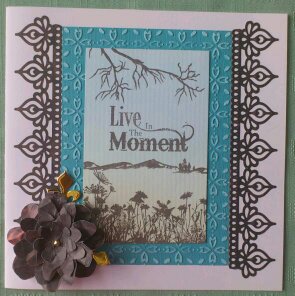
Barbara welcomed us all and what a marvellous teacher she is. She talked and showed us through making a brayered picture. ....also making me want the stamps we were using!
Here is the picture we did. 


We finished the workshop at just about 10am when the show was opening and then we had the show to look round.
Barbara had given all the people doing the workshop a £5 voucher to spend on the Clarity stand so that was our first port of call!
Maria Simms had been helping with the workshop and from that went straight on to the Clarity Stand to do a demo. We watched her do a fantastic demo using angel film and fibres and a craft iron. Then we got a basket and proceeded to fill it with clarity crafty goodies.
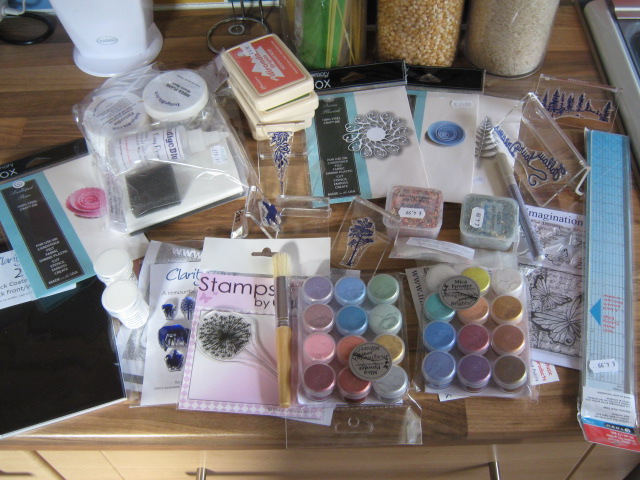
Here is what I bought from Clarity

 After Clarity had been raided the rest of the show was looked round! I had no list and was not really there to buy much....but it would be rude not to buy some things

Some lovely dies! 
 Mica Powders and some Wow embossing powders.

IndigoBlu Flitterglue starter kit! 

Two lovely stamps!
So all in all I had a great day. And we found time to sit and have our sandwiches!.

After we had been rond the show twice...just to make sure there was nothing else we wanted we went back to Clarity to say bye to Barbara and everyone else! Barbara did us a demo using gilding flakes which was so good!

So at 1.30 we had spent all we wanted if you could ever do that at a craft show....I could have spent loads more if I didn't have to worry about it!
I phoned Colin and said we would meet him outside. And as we got to the door he was there! Little love!
Heads buzzing with ideas from the demo's we had seen we went home.

What a thrilling day! 

During the day I had met some of my Facebook friends who are all lovely people and hopefully I will be seeing them again soon! Rae, Carol, Lynne and Linda, it was fab to meet you face to face!

Here's everything I bought in one place...quite a lot I think!


Hope you are having a crafty day

Jane xx

Wednesday 14 March 2012

Barbara's Card

I just had to send Barbara Gray a card to say happy birthday!!! And what better excuse to make a card that for me is a bit more challenging.
I used the Clarity Mandarin Duck stamp and stamped it onto the double sided adhesive sheets. I then covered it in acetate before removing the back of the adhesive sheet. I then used the copper gilding flakes to put behind the image. There are some lovely colours in that flake and I used my tweezers to pick out colours to go on the area where the duck was. Then I filled in the rest of the area before mounting it on to a piece of card.
The background on the card was done by stamping a Lavinia stamp with versamark onto black card stock then using mica powders to colour it.

And there you can see it.


Hope you are having a good day and please let me know what you think of my card for Barbara!


Jane xx

Sunday 11 March 2012

Red Roses

With Paint Fusion and all I have been painting allsorts of things but always sticking to pastel shades of flowers especially on the roses. I have done some delicate lemon and pink roses where the pink or the yellow has been mixed in with white to give the light and shade in the rose.
I wanted to have a go at painting red roses. So how hard could it be. I mean red roses are red! So I got the paint out and selected my red paint....then I stopped. How was I going to get the shading. If I put white with the red they would be pink roses. So I looked at my paints and I had 3 shades of red...a scarlet, one called rouge and a burgundy. I thought if I put the burgundy on one edge of the brush and the rouge on the other that would give me the shade I needed to have some contrast in the rose. So off I went and painted the rose...It was OK but not what I wanted really. I debated other colours I could use as my dark until I picked up the black.....I wonder what that would look like. I painted a second rose using the rouge and black and on the rouge edge I dipped a bit of scarlet to really make the edges bright! and yes that was what I wanted. Here is the trial piece I did to get my final red rose!!!


The bottom rose is the one with the black and I think you will agree it is the better one. I had a practice at doing the leaves too!
Then I painted a single red rose. I think this would make a lovely anniversary card.


Then finally I got my candle out to paint. I got this one from Lidl at just over £1 and its scented! so now it smells nice as well as looking quite pleasing!


So there it is....my attempt at painting red roses.
I hope your weekend has been nice and crafty. 

Jane


Friday 9 March 2012

Card for James

It has been my nephews 5th birthday this week so I decided to make him a Tatty Teddy card. I used the docrafts CD rom to do it. Here it is. 


I put glaze on the number and on his nose just to make it shiny.

Hope you have had a nice crafty day!

Jane xx

Thursday 8 March 2012

Grain of sand!

I have had a play last night with some clarity stamps and a brayer. I saw Barbara Gray use this technique on Sunday afternoon on Create and Craft and loved it. I haven't got the stamps she used....well the quote is the same!


The backing paper I made by stamping the grasses stamp over and over again in a random pattern and not re-inking the stamp each time. I used a Big and Juicy ink pad...the colour is called Waterfall. I just love the blue and green it gives you.

The strip is a new spellbinders set....Damask Accents and the flower is the Persian Motifs set.

I do like this technique and how the panels pop out at you yet they are all actually flat!!!


Hope you are all OK

Jane xx


Sunday 4 March 2012

Mandarin Duck

Here is the card I did for the Clarity Challenge last month. I didn't win but I do enjoy entering the challenges.


I do love the clarity Stamps 


Hope you are all enjoying the weekend

Jane xx

Friday 24 February 2012

An Award ....how Exciting!!!

Well - they say small is beautiful so how lovely to receive my first blog award from the lovely Fiona (who's blog is fab and definitely worth a look too) for my little blog! Thank you so much for thinking of me x
The idea of the Liebster Blog Award is to spread the love from one small blog (under 200 followers) to other small blogs. This helps to spread knowledge and readership


To accept the award, you must:


1) Link back to the person who gave it and thank them for thinking of you.


2) Post the award to your blog.


3) Give the award to 5 bloggers (with less than 200 followers) that you appreciate and value.


4) Leave a comment on the blogs of the five people you have chosen to let them know.
"Liebster" in German means "dearest", so to carry on the Liebster tradition, I am going to pass the award on to 5 people who's blogs have been an inspiration to me and my crafting.

All of these ladies are amazing crafters and have inspirational blogs.