Followers

Tuesday 14 April 2020

Love, Laugh and Dance

Good afternoon to you all and welcome to the new followers. I hadn't noticed that I have had a few new people join me on my blog and that is lovely to know.
So how are you all doing in this weird time... I say weird as it looks so nice outside with brilliant sunshine and bright blue skies, yet we know that if we were to go out and meet up with people as we would normally do with this type of weather we could become very poorly. So we stay at home and keep safe.... if we have any sense that is!
How do you pass your day? I am lucky that I have a hobby that I can do that I can easily become absorbed in and before I know it 3 hours have passed! Colin also has his hobby which takes him out into his man cave ...means I can get all my stuff out and make a mess! 
Anyway I was hoping to have had new stamps today to make samples with but they didn't arrive. Our post only seems to come once a week at the moment!  Instead I finished my doodle that I started with Barbara this morning then did another one. Then I decided to make a card using one of the Leonie Pujol stamp sets. It's the adventure one.

Here's what I made


Here is a step by step of how I made it.
This is what I used.

The inks are mermaid lagoon, Wilted violet and Picked Raspberry.
Cut a piece of stamping card 13cmx19cm 

Brush with baby powder or an anti static pad.

Stamp the mandala using versamark. I used a stamp platform so I could restamp it 3 times. This gives you more ink for the powder to stick to and gives a better result. Leave the stamp on the stamp press.


Add white embossing powder and heat emboss. Put the card back on your stamp platform turning it round so the top is now the bottom. Repeat the last step so that you have the mandala at the top and bottom of the card.

Now use a blending tool and the 3 inks to make the background 


When you have the depth of colour you want use the little stamps in the set and the different inks to add detail.

Now use a fan brush and splash with water. Blot it with a paper towel.

Do the same again but this time with the 3 colours of ink with water added 


Dry it off. I gave it a quick blast with the heat tool but be careful not to overheat the embossing.

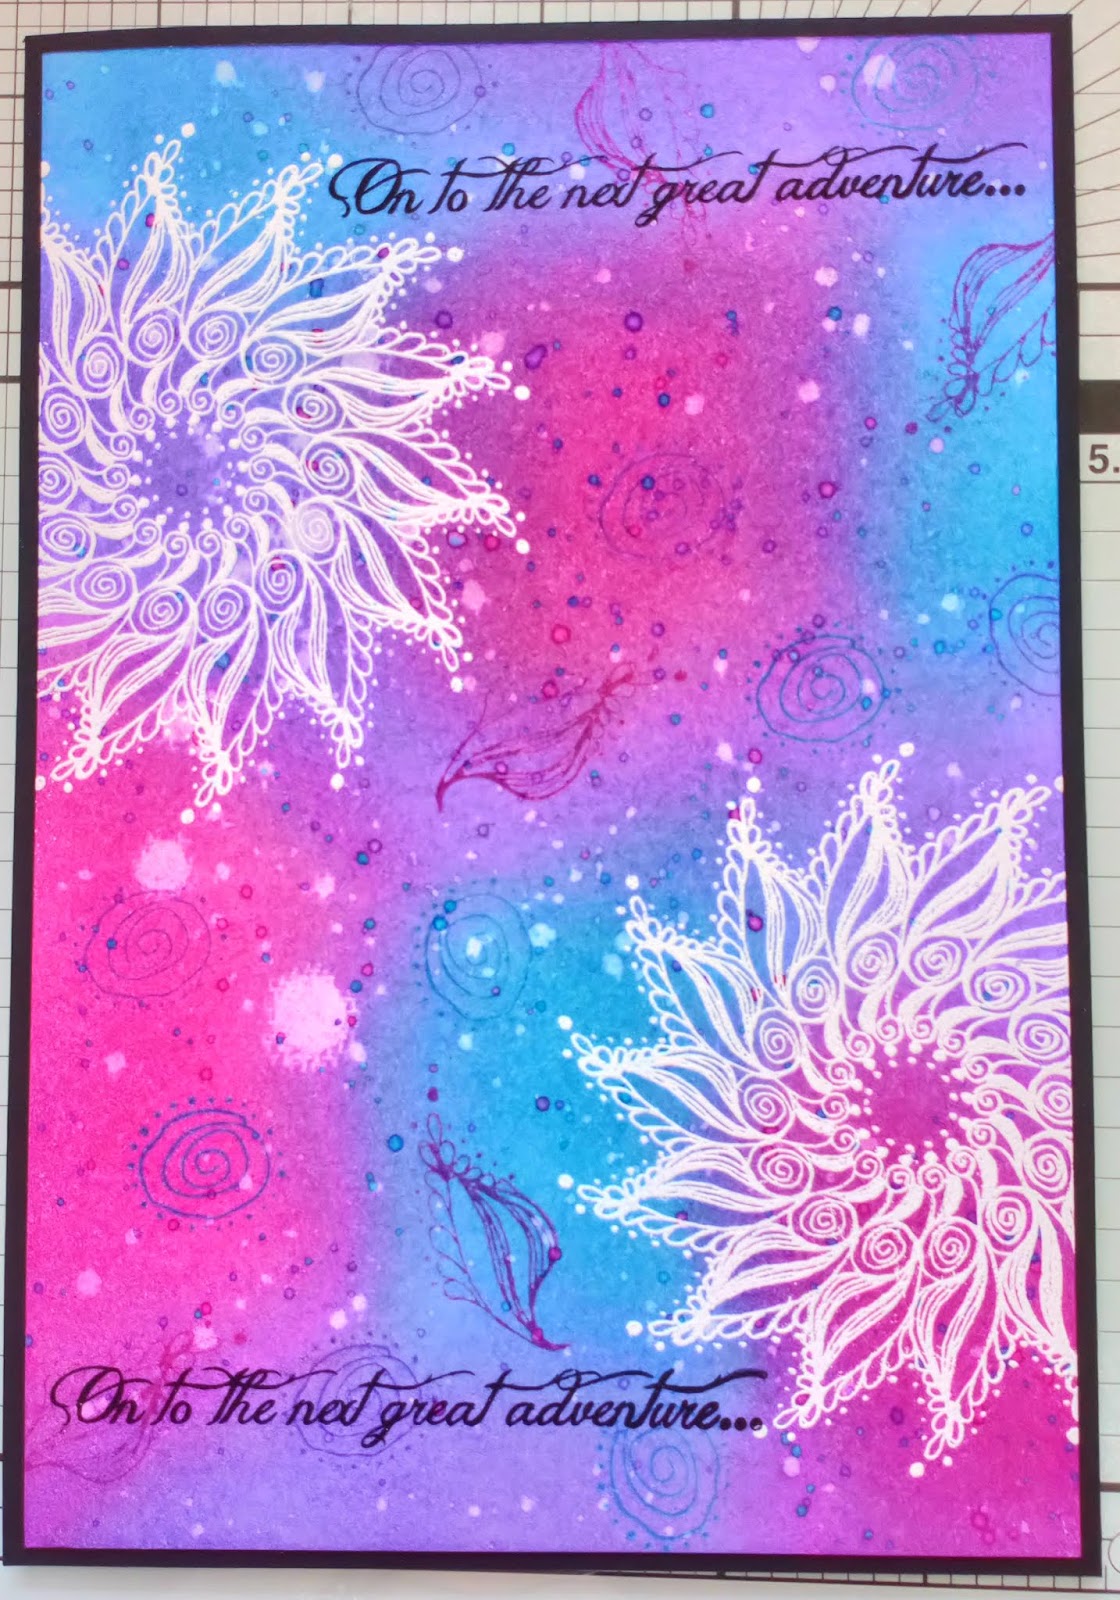
Stamp the words from the set and mat onto a piece of black card. Attach to the front of an A5 card then add some words from Leonie's sticker collection.

Hope you like todays project. Leave me a comment at the bottom to say hello and let me know what you think.

Happy Crafting 


Sunday 12 April 2020

A couple of old bags!

Good afternoon and a Happy Easter to you all.
Welcome to the new people who have recently started to follow my blog! I am pleased to have you here. I do hope you find something of interest here. Leave me a comment on here if you do!
It's been a very quiet day here but to be honest I don't mind that as I can just do whatever I like and I don't feel pressured to have to go out and see people. That makes me sound like a real hermit but those of you who know me properly know I am not! But I do think that at holidays people feel that they must go a visit people but of course this year we absolutely cannot! 
I thought I would play with the Rocky Block stencil again today and include another product of the month and use the Handbags & Purses stamp set . I have made a card and done a step by step for you too.
Here is what I did and now you understand the blog title.


I used the stencil and the stamp set, a piece of stencil card plus 4 distress inks and Leonie's sticker set.


Here's how I did it.
 

Stamp the bag then mask off. Stamp again so they overlap then mask that one too. (I had cut some out before I remembered I had the masks! But I used the handles as I didn't want to cut those out!)


Now attach the stencil with some low tack tape along one edge so it acts as a hinge.

Brush the yellow ink through the stencil 


Take the stencil off and turn it a quarter turn, then brush over with the pink ink.
Turn it again and brush with blue and then again with the green.


Remove the masks.


Draw a wiggly line around the stenciled shape with a micron pen
 then edge the card with a black sharpie.

Colour the bags with promarkers

Put a shadow under the bags with a grey promarker.


Attach to the front of an 8x8 card blank then add a sticker sentiment.

I hope you like the card today and that it has inspired you to have a go. Don't forget you could change the focal stamp to anything really or just do the background and use a silhouette stamp. 

Have a lovely evening.

Happy crafting and stay safe.


Saturday 11 April 2020

Rocky block doodle

Good afternoon all . 
Isn't it a beautiful day. I do hope that you have been able to get out into your own outdoor space and enjoy this sun we're having but keeping safe and well at the same time.
Actually I think just seeing the sun and having the windows and back door open makes you feel better.....well it does me. It lifts my mood and that helps keep dark thoughts form creeping in. It is hard not to dwell on things at the moment but I am trying to limit the amount of news I look at during the day and I am trying to keep busy with lots of things. 
I have been enjoying doing Maria's online stamping class. Her classes are always a highlight of my month with fab projects.  But with the virus they have had to stop but Maria has worked out how to continue with them online. If you fancy doing one of her classes you can contact her direct through Facebook....you will not be disappointed I can promise you that.
I was looking at the Claritystamp website earlier and saw what the products of the month are. One is the Rocky block Stencil. It's fab! So I thought I would dig it out and do a few projects with it over the next few days. I will probably include some of the other products of the month too but I will highlight those as I do.
Today I thought I would share with you a sample I made back in July 2019 ...awwww a very happy month that was (Amy and Matty got married). 

Here it is. I thought it fitted into my recent theme of doodling too.


I don't have a step by step today but its actually very easy to achieve.
All you need is a piece of 7 x 7 stencil card, the rocky block stencil and a black micron pen. These are the pens that Barbara has been using when doing the doodle sessions on her fb lives over the past week.
Attach the stencil to the to the card with some low tack tape so its like a hinge at the top.
Use a black micron pen to draw around all the stencil to give you the outlines.
Remove the stencil then doodle in each section with a different pattern. I coloured the eye in to add a splash of colour. You could change this by doing something different in that section.
Edge the card with a black sharpie pen then mat onto a piece of card to reflect the splash of colour you added.
Attach to an 8x8 card blank then add one of Barbara's stickers. Job done.

There are a few clarity stencils that you could use if you look through your stash 
If you have a go let me know. I would love to see it if possible
Happy Crafting


Friday 10 April 2020

Gratitude for doodles

Good afternoon all! I hope you have had a good Good Friday. I decided to sit outside today for a little while and found a perfect spot that was away from the main part of the garden. I suffer if I get bitten or stung so I can't sit on the lawn as this is where I nearly always eaten alive! But it was nice to sit a while and get some fresh air. I am not sure if Colin was pleased though as he was working in the garden and I was chatting to him......no escape from me today! I might do that again tomorrow if the weather is as nice as it says it's going to be!
I think it did me good as I came in and got on to do a step by step card to share with you. It is only a very simple one but it can be easily changed by using a different word or using a different colour.
So here it is. 


 Ingredients
Cracked pistachio Distress Ink
Versafine Onyx Black Ink
Stencil card
Low tack tape

Start off by taping off a section of the card. I cover the parts you want white with tape to avoid smudges.

Using the square stamp from the set mask off the edge then ink up. Remove the tape then stamp this over the area you have masked off. 

 Mask off both sides of the stamp and repeat the stamping making sure you stamp touching the previous one. Continue masking and stamping until the panel is filled. Leave to dry. 
Now get a brush and the distress ink.

Brush the ink over the top and bottom of the panel building up the colour next to the tape but leaving the centre of the panel paler.

Carefully remove the tape and using a fineliner pen draw a wobbly line along the top and bottom of the panel. Then stamp the border along the panel as shown.


On a piece of spare card stamp the word and then use a blending tool to add ink around the edge.


Use a black sharpie pen to edge the card. Attach to an 8x8 card blank then add the word with 3D foam.


I hope you like the project today. Have a go if you like but if you do please let me know how you get on.

Happy Crafting 


Wednesday 8 April 2020

A bit of some Doodleology!

Good afternoon all! I hope you are all ok! 
It has been a very lovely day today. Bright sunshine and quite warm too! The only downside is that it brings people out when they should be staying at home!.
I can't sit in the garden as if I do I end up with bites and stings and I don't want that! But it is nice to see the sun and have the windows and back door open ….makes a big difference to how I feel!
I have been enjoying doing the doodles with Barbara every morning at 10am on the Claritystamp Facebook page. Or it's on You tube if you want to catch up later with it.
I decided to carry on with the doodle theme and use the Doodleology stamps to create a card. Here is what I made.


Ingredients
Distress inks - Rusty Hinge and Chipped sapphire
Onyx Black Versafine Ink 
Black fineliner
Stencil card 
Black card
A5 card blank 

Start off with the largest stamp out of the set and the two distress inks. Leave the stamp on the acetate to use it rather than putting it on a block


Ink up the stamp with the rusty hinge ink and then lightly spritz the stamp with water(don't overdo this) then stamp it on the card. Repeat using the blue ink trying to get the blue over the orange.

So you should end up with something like this.


Trim the card around the stamped area back 

Using the two ink pads and a fine paintbrush colour in the open areas of the stamp. 
Let it dry.


Stamp the sentiment and the fly away boy into position. I used a stamp press and versafine ink. You could use archival ink.


I used a black fineliner to go around the outside of the stamped area the matted it onto a piece of black paper then onto a card blank.

I hope you like what I did.
Please let me know in the comments below.
If you have a go feel free to post on social media but please tag me in so I can see how you did.

Happy Crafting