Well Christmas Eve and all is ready here...well it will be when Amy arrives. We are going out with Amy and her young man, Matthew tonight to the pub and I am really looking forward to a lively evening!
I thought I would blog the three remaining cards from the last clarity show at the beginning of December.
The first used the cicle aperture and the chrysanthemum stamps.
I managed to bend the sentiment so it fit round the shape of the circle too.
I was glad I had spent a bit of time cutting out the masks for the chrsanths and leaves for the other card and that I kept them!!!
The circle aperture is lovely and with the insert makes it a bit different
The next card I did used the stencil of the flowers which I ran though the grand calibur onto a piece of pearlescent card. Then whilst the stencil was still in place I brushed over the surface with different coolours of distress inks to give it that floral feel.
I then removed the stencil and wanted a piece of card to mount this onto. The card out of the packet of the stencil was there....perfect! and I didn't even need to cut it!
I stamped the Congratulations in Cobalt blue archival and added a gem in each corner to finish it off.
For my final card I cheated a bit and decided to repeat a card I had made before for the Clarity Challenge Blog. It was the one I did using Kasha.
I did update it a bit and used the corner stamp instead of peel offs and used the arch aperture stencil to stamp her into. I also used the clarity wall stencil which I didn't have to my disposal when I last made this card. I also added a sentiment.
I was pleased with how it had turned out and think that it is better second time around!
Anyway I must away as I have my girlie about to arrive.
Have a great Christmas and I will look forward to you leaving me a comment if you get to visit me over the Christmas period.
Happy Christmas Crafting.
A little insight into my crafting world (and anything else I may care to add) Please kindly do not copy or upload any of my work claiming it to be your own. Many Thanks
Followers
Tuesday, 24 December 2013
Wednesday, 18 December 2013
Big Orange Flowers!
When I was very young I can remember my grandma always having big orange flowers in the glass vase on the kitchen table and there were always 5! I know now they were chrysanthemums but to me as a child, they were just big and orange. To this day they make me smile as they hold such happy memories of my Grandma and Grandad, who I spent a lot of time with as a child playing in their back garden or on the rug in front of the fire.
So when I got these stamps a little smile lit up my face and I knew I had to do big orange flowers!
The Background is done with the matching stencil. I used the leaves from the Leaf set 1 but I had to mask the flowers which took a bit of cutting out. I also stamped and embossed the congratulation sentiment. I bent it into shape to fit round the flowers and it worked pretty well. I di the topper on a luggage tag and then mounted this onto brown card the onto the backing card before I put it on the 8 x 8 card blank. I finished with a bit of green ribbon and a sparkle gem and a couple of Sweet lilac flowers.
I hope you like this card.
Please leave me a comment if you visit today!
Happy Crafting
Wednesday, 11 December 2013
Hello Flower
Good morning.
I have been a bit quiet because I have had this awful flu that seems to be doing the rounds but today a feel a little better so I thought I would blog one of my cards from the December clarity shows.
This one used the Chrysanthemum stencil and what a fabulous stencil it is.
And this technique is one used by Eileen Godwin and so well explained to me by my friend Amanda Branston so thanks to them both!
I got a piece of watercolour paper and cut it to the same size as the stencil. I then ran the paper and the stencil through my grand calibur so that it was embossed. I then brayered over with versamark and applied clear embossing powder which I then heated. I then used distress ink which I applied to the card with a wet paintbrush and this is the effect.
I added a pale blue wash in the corner and then trimmed the paper back to the size of the flower.
I then took an 8x8 card blank and using pink and yellow distress inks 1st and 2nd generation I stamped all over the edges of the card with the large and small chrysanthemum stamps to create a background. I mounted the topper onto a piece of pink pearlescent card and then onto the stamped card.
I added some dewdrops to the corners and that was the card made.
I think it looked quite cheery and I was pleased at how it turned out. What do you think?
Have a good day
Happy Crafting
Sunday, 1 December 2013
Down by the Canal
Last month we saw some beautiful cards again and it is getting harder and harder each month to pick out the best as they are all so good!
This month it is all about scene building and there are some really fabulous cards from the design team to inspire you! Its well worth a look at their blogs to see how they did them!
So to my card for this challenge. I started off sitting and not having a clue what to do!
Then I looked through the Clarity Catalogue. I often find if I am stuck for ideas if I look through there I suddenly start to get a plan in my head. However it also reminds me of stamps I still need to get!!
Anyhow I'd formulated a plan and then got all the necessary bits and pieces together!
Here is the card I made.
I started off by making the kingfisher out of angelina fibres. I used a mixture of white, pink, blue and green. I cut it out and put it to one side for later.
I drew out a rough plan and used the stamps to give me an idea where I wanted things positioning!
I then got a piece of Theuva card and stamped the windmil and the barge then the branch. I masked the windmill and barge so I could colour them later.
I then masked off the section for the river and using a brayer I created the river. I then used paper masks to create the land and the clouds mask to do the sky. I did put a sun mask so I could get the sun.
I then used the trees and the birds to make the picture more dimensional. The bottom of the trunks make the fence (along with a brown fineliner pen) and the sides of the trees make the grasses along the canal bank and the tuffs of grass in the fields. I used the edge of a post it to do the sun rays! I then removed the masks of the barge and the windmill and coloured these with promarkers.
I then stuck the kingfisher to sit on the branch and the card was matted and layered on to brown and then sand coloured card then onto an A4 card blank which I had used a stencil on to give a soft green background.
I love how the angelina fibres always give you different results and the colours can be so different.
And there is my scene!
I hope you like it!
Now over to you. Lets see some great scenes form all of you happy clarity stampers out there!
Happy Crafting
Saturday, 30 November 2013
On the Farm
My last two cards from last months samples are here! I am a bit behind as I have had a very busy month with one thing an another.
The first is one of the cards shown on the Classroom show today and is very similar to the card Barbara did but the other way round..
I added a ribbon and a couple of embellishments to finish the card off.
The last card I enjoyed doing and it was using the twiggy framer set and the miniture farm animals set. I made this scene and then to complete it I used the letterbox set to make the Down on the farm sentiment. I really love that set and the new shapes are well worth getting as they really add to the versatility of the set.
I hope you are having a good day! I am. I have been to the Christmas Markets in Manchester with Amy and then came home and had a cuppa watching the classroom with Barbara Gray which I had recorded! How marvellous!
Have a good evening and happy Crafting
Thursday, 28 November 2013
Fantastic Fuchsias
On the last months Clarity Weekend one of the stamp sets was a fuchsia and leaves set! They are a fab set. Here are the cards I made with them
The first one used a gelli plate background. I then stamped the fuchsia onto theuva card coloured it with promarkers and then cut these out. I stamped a border of leaves around the page and a branch in to the centre then stuck the fuchsias to the card!
The next card I used another Gelli background but this time I deciced to do paint fusion technique with the fuchsia! So out came the paints and voila!
Hoped you enjoyed seeing them
Happy Crafting
XXX
Friday, 22 November 2013
A most magnificent Bird
Well I have had a most hectic and exhausting week but its gone fast so that helps!
Today I will share with you the two cards I made for the Clarity shows using the tree Woodpecker and branch stencil set. The dirst used a print fron the Gelli plate and I had to slit along the branch so I could slip the woodpecker through it to look like he was sitting on the branch.
Hope you like them
Happy Crafting
Today I will share with you the two cards I made for the Clarity shows using the tree Woodpecker and branch stencil set. The dirst used a print fron the Gelli plate and I had to slit along the branch so I could slip the woodpecker through it to look like he was sitting on the branch.
The next one I wanted to have a very different look and just stamped the bird onto a piece of Theuva Card then added zentangle patterns into his feathers. I used the branch stencil to add the branch just tracing along it with a black pen and shading it in with lines
Hope you like them
Happy Crafting
Tuesday, 12 November 2013
A bit of Sunshine
Well it's Tuesday and feels a long way off to the weekend! But its been a reasonable day so all is good.
Todays Card is using the Sunshine stencil and the next classroom stamps, Rise and Shine, the cockerel, and the swallows.
I love this stencil and had the idea to make a graduated colour wheel but try and still make it look like a sun. I picked out all my reds yellows and oranges from my collection of distress inks and decided on which I was going to use. I finally decided on nine and that meant that 2 arms would be coloured for each colour! I used the smallest calrity stencil brush to do most of the work but then used a make up sponge in the corners to really give good definition.
I then stamped the rice and shine words in the centre and the cockerel and swallows to complete the topper in black archival ink.
I brushed aound the edges with the stencil brush but without adding more ink just to take the white off the edges.
I mounted this onto black card then onto a cream 8 x 8 card blank. I finished it with 3 black gems in each corner.
I hope you like it
Happy Crafting
Jane xx
Sunday, 10 November 2013
A whole Lotta Roses
Well Good Afternoon to you all.
What a lovely bright and crisp morning we have had and the afternoon looks like it will be much the same! And for all those who ventured out to centataphs and churches or wherever for a remembrance ceremony I am sure you were glad of the respite in the dreadful weather we are having!
For you today I have another of the cards from last weekends clarity Shows.
This one used the Squiggles Stencil. Its a really lovley stencil and it can be used on its own as it has been here or with the Rocky blocks stencil to get loads of cool patterns.
I firstly created my background on the gelli plate ....best thing to come out in ages I reckon...using the stencil with some sequin waste and bubble wrap to make more interest.
I did a couple of layers blotting it each time to create white areas.
I left this to dry and stamped and embossed my roses on to a piece of theuva card. You need to be quick! I used butterscotch adirondack ink and clear embossing powder. I then coloured them in promarkers and cut them out!
I cut some die cuts from silver miri card.
Once my background was thoroughly dry I inked over it in Butterscotch adirondack ink. I also brushed around the edge of the card with the ink to soften the edge. I used the clarity stencil brushes to do this... they are so lovely to use.
I matted my background onto some silver miri card and then onto a 8 x 8 card blank. I arranged the roses and the flourishes, leaves and butterfly onto the background and attached with glue.
Here is a different view of the card I think you can see the roses better on this one.
I hope you are having a good weekend and enjoy the rest of it!
Happy Crafting
Jane xx
What a lovely bright and crisp morning we have had and the afternoon looks like it will be much the same! And for all those who ventured out to centataphs and churches or wherever for a remembrance ceremony I am sure you were glad of the respite in the dreadful weather we are having!
For you today I have another of the cards from last weekends clarity Shows.
This one used the Squiggles Stencil. Its a really lovley stencil and it can be used on its own as it has been here or with the Rocky blocks stencil to get loads of cool patterns.
I did a couple of layers blotting it each time to create white areas.
I left this to dry and stamped and embossed my roses on to a piece of theuva card. You need to be quick! I used butterscotch adirondack ink and clear embossing powder. I then coloured them in promarkers and cut them out!
I cut some die cuts from silver miri card.
Once my background was thoroughly dry I inked over it in Butterscotch adirondack ink. I also brushed around the edge of the card with the ink to soften the edge. I used the clarity stencil brushes to do this... they are so lovely to use.
I matted my background onto some silver miri card and then onto a 8 x 8 card blank. I arranged the roses and the flourishes, leaves and butterfly onto the background and attached with glue.
Here is a different view of the card I think you can see the roses better on this one.
I hope you are having a good weekend and enjoy the rest of it!
Happy Crafting
Jane xx
Saturday, 9 November 2013
Another Filigraphy Flower
Good Saturday Morning. And a bright one at that which is great after all the rain we've been having
I am going to share with you today another of my samples from the November Clarity Shows.
This one used the Filigraphy Framer and the remountable shapes that fit so perfectly.
I stamped and silver embossed the framer twice with the circle stamped in the centre. I used white smooth card stock so I could colour the white bits with promarkers. I used shades of blue to do this.
I also stamped and embossed the butterfly and 2 heart shapes.
I cut out all of the shapes and also a long thin piece of silver card
I then stuck the pieces together to create a flower....the hearts became the leaves.
Here it is.
Please feel free to leave a comment. I would love to know what you thought of it!
Happy Crafting
Jane xx
Tuesday, 5 November 2013
Filigraphy leaves make a Flower
Well what a fab weekend of Clarity Shows. The classroom on Saturday and the regular shows were absolutely fab! The stamps were all lovely and Barbara did the most amazing demos. All the Design Teams Samples were brilliant and I feel so proud to say I am a part of that team.
The first card I want to blog from the shows is this one using the Filigraghy leaves set.
Here it is! I know a lot of people seemed to like this one and I nearly didn't send it in! It was quite simple to make and used embossing and decoupage of the stamp as the main techniques.
The first thing I did was stamp and emboss the full image twice onto some black card using mica boss powder. this goes sticky when you heat it! I then added the gilding flakes. I used the Variagated Copper ones. I pressed them onto the mica boss and then gently rubbed off the excess.
I cut pieces out of one of the shpaes and cut down the lines to the middle section so I could shape it more and curl the leaves to add even more dimension.
I then took a piece of black card and cut a square. I stamped in the image in each corner with versamark and embossed it in clear detail powder. I matted this onto a squre of jade green pearlescent card and then onto a white card blank.
I then added the first layer of the 'flower' and then the second ond I glued by the centre on to it making sure the leaves were well curled on the second but still lined them up. Quite a simple card really but so effective I think. What do you reckon? I'd love to know.
Here are some more shots of the card. You can really see the dimension on this one!
And this one is a close up of the 'flower'
To all those going to the NEC this weekend have a great time and I wish I was going but funds won't allow at the minute!!
Happy Crafting
Jane xx
Friday, 1 November 2013
It's Christmas over at Clarity
Good Morning to you all and today sees the new challenge start over at the Claritystamp Challenge Blog.
It is also my eldest Neice Danielle'e 18th birthday so Happy Birthday to you Dani....I can't believe you're 18 already!!!
This week has been a good week...half term hols are where I can just take a breather from the constant rush it seems to be when it's work. However I seem to be cramming a lot into this week too although not it not the same type of busy!
Anyway enough of my waffle....on to the challenge. Last Month we saw some stunning entries and so congratulations has to go to the winner and to the top five.
This month has to be Christmas....and I know the DT have got some stunning projects and Cards for you to look at. I hope you will visit all their blogs and see how they did them.
Here is my Card for the challenge. Its quite a simple one to do really.
I used the kings and the nativity stamp sets from the recent run of Clarity Christmas stamps. I also used the music score We three kings.
To make the card I took a DL card blank and masked it off so just the centre was showing about 1" (or 2.5 cm). Make sure you use a very low tack masking tape to do this!
I then took 4 bright colours of distress ink. I used Mustard Seed (Yellow), mowed lawn (green), worn lipstick (red) and Salty Ocean (Blue) and blended blobs of colour randomly over the centre part. Make sure there is no white showing and over lap the colours slightly. I then stamped the music score in black archival. Change the stamp direction so you get a true random feel to the centre strip.
Remove the masking tape ....carefully. Stamp the three kings and the nativity scene and the star into place and use a black micron pen to complete the banner part and neaten it up. And thats it! Its quite easy to change the look of this card by altering colours and width of the central banner, and no worries about extra postage costs as its all on one layer.
I hope you feel inspired to have a go at the challenge and remember there is a voucher of £50 to spend with Clarity. Just remember that any stamps you use to make your card MUST be from clarity.
Happy Crafting
Thursday, 31 October 2013
Cakes and Fishes
Well last two cards form last months clarity Samples. I don't have a lot of time to give you all the deets but felt I needed to get them on today as the next shows are this weekend and then I will have even more to put on.
These were special cards. As Barbara was doing extra shows over the Clarity weekend starting on th eFriday she had asked the DT to help her out and do some demo set ups. These were my two. The first one didn't get used as the set of shapes for the letterbox kit sold out so quickly and not surprisingly really.
Here it is.
As you can see I had used the tags to create an advert for a Cake Sale. I had also used the miniture Kitchen set which I love and it makes the most adorable cards...large and small!
It took a lot of masking and I was grateful that we now have masks for the shapes as it saves so much cutting out. I had to make masks for the cakes but at least they are easy shapes to cut out.
The inks I used are Adirondacks - butterscotch and espresso
The next card was a bit more complicated and I was thrilled to see Barbara use this on on the telly and yes for those of you who saw it I was shouting instructions at her as I watched it!!!
I used clarity card for this and the cling film trick where you brayer the card with ink then spritz a piece of cling film with water and layer it over the card scrunching it up so you get lovely texture to your back ground.
I then let this dry and then stamped the fish and coral onto it. I coloured the fish and coral with promarkers. I also brushed ink through a piece of sequin waste to add bubbles.
Over the top of the card I put a piece of acetate that I had stamped the coral onto in black archival ink. Turn it over and colour the reverse with promarkers. That way the ink won't bleed. Attach the acetate to the clarity card using brads to make it look like a fish tank.
The backing paper is a piece of paper that I used to mop up the ink from my splodge mat. This meant it was the right tones to match my card.
I finished my card off with a fish embellishment.
And there you have it!
Happy Crafting
Tuesday, 29 October 2013
Sapling Trees and Cherries
Here are two more of my cards from last months clarity
This one uses the Sapling trees and mica powders.
It really is quite easy to do but does need a quick spray with cheap hairspray once it has been finished to help fix the mica powders
I even used the clarity masks to do the moon and the hils and mountains... was a bit strange using versamark with these as you can't really see what you've done until you apply the powders.
The base card also had versamark stamped onto it and then mica powder applied to create the background to the main topper.
The next card used a stencil and was really easy to do.
I placed the stencil on a piece of card cut to 19 x 19 cm and then brushed with ink. I darkened some of the areas. Then I removed the stencil and over the cherries I brushed some pink ink and green over the leaves.
I then drew freehand around the inked area and made a border colouring it with pencil crayons.
I mounted it onto a piece of pink card then onto a white card blank.
I added some flowers and there you go ! A nice quick and easy but I hope you agree effective card.
Have a lovely evening
Happy Crafting
Monday, 28 October 2013
Woody Woodpecker and Co
I need to share some more cards with you from the last Clarity Weekend
This time its the next classroom stamps that were briefly shown on the classroom show on Saturday. Its a woodpecker and flower stamp and with it is a stencil that could be a tree trunk but could be so much more.
The first card I made using the flower part. I stamped the image one way then turned the paper round and matched up the edge of the stamp so it gave a big floral centre piece So glad that you can see through the stamp I then stamped it again a couple of times onto some more smooth decoupage paper so that I could decoupage some of the flowers. I stamped around the edge of the card with the large sapling tree to get just the leaves on the edge of the card. I coloured it all in with promarkers.
The 8 X 8 blank card I used the corner of the stencil and brushed through it with lettuce adirondack to create the background . I mounted the topper onto black card then on to the card blank and finished it with a ribbon and some flowers. I decoupaged some of the flowers so it gave it a bit more dimension.
The next card I made using this kit was this one.
For this I used a double sided adhesive sheet and stamped the woodpecker to one side of it. I stamped the verse where I wanted it to go to look like the bird was clinging to it! I then covered it up with a piece of acetate.
I used a white pen on the reverse of the woodpecker to make his white bits stand out more and a red promarker for his head and under his tummy. I used a mixture of gilding flakes and mica powders to create the background to the wookpecker. I stuck the stencil on to the adhesive sheet to act as a guide and it seemed to work quite well. Its a good job the stencils are robust as the adhesive sheets are really sticky.
Once I had made the topper it was mounted on to black card and on to a plain white A5 card blank and finished off with 5 tiny black gems. I didn't think it needed anything else on it.
Thats it for today. I hope you enjoyed looking. Please let me know what you think.
Happy Crafting
Jane xx
Sunday, 27 October 2013
Bonnie Scotland
Good Morning to you all
I thought it was about time I put my other cards on my blog from last months Clarityathon. This time next week we will be in the mibble of the next lot of shows!!!
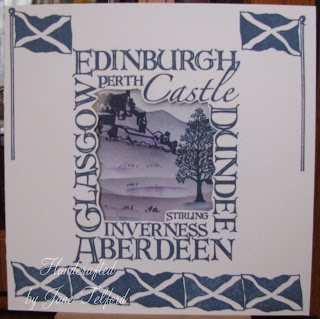
In honour of 'Our Barb' being in Scotland at the SECC I thought I would start of by blogging my Card using the Scottish stamp set. I added the deer scape and the large and small larch.
The front of the card I used just Denim Adirondack to stamp the frame with and used the flag and flag pole around it. I also cut an apeture in the frame and attached a piece of acetate to the back of it so it looked like a window.
In side the card I created a scene using the castle, the deerscape and the trees. I used denim and purple twilight adironacks to do this. My idea was that I wanted a moody picture and one that also had the flavour of heather on the mountains of the highlands!
Here is the front of the card.
Here is the inside
Colin said the whole card looked like an advert for the Scottish Tourist Board!!!
Anyway I hope you like it.
I am enjoying a relaxing Sunday finishing off next months samples and and happy in the knowledge that tomorrow I am on holiday!
Happy Crafting
Jane xx
Sunday, 13 October 2013
Oh Beehive!
Here is another of my samples from the Clarity Stamp Weekend. You did see this one on friday but the set was so popular you might have missed it!
This one takes us back to one of the early classroom shows when Barbara demonstrated how to create a Bee hive. As soon as I saw the shapes this one also popped into my head! I thought the hexagons would make a lovely background making it look like honey comb! I think it helped that I had been to the Harrogate Flower show recently and I am always fascinated by the Bee keepers Society that always have a stand there.
I started off by creating the beehive in the centre by cutting a mask for it from copy paper then inking through it masking off the sections to get the lines I then cut a little door into the inny bit and inked with espresson to create the bees way in.
I then stamped the hexagons for the words around the hive in butterscotch adirondack and masked them off. The new masks are fab for this.
I continued to stamp hexagons all around the edge of the card. I then used a stencil brush...the new clarity ones are fab! .....and brushed butterscotch ink around the outside edge to create a soft yellow colour. As I got near to the hive I stopped brushing to highlight the centre.
I then removed the masks from the hexagons and in espresso I stamped the letters to read BEE HAPPY. Then stamped the bees in place.
I mounted this onto dark brown then cream card. The card blank I stamped around the edge with the hexagons and bees but blotted first to get a softer colour and without reloading my brush I softened the white card before adding my topper.
Hope you like it and if you got the shapes set well done.....if you didn't I hope you get one soon! xx
Happy Crafting
Jane xx
Clearly a Clarity Weekend
Well its been a great weekend so far with Barbara Gray on the TV showing us all some marvellous tips and tricks in the art of stamping!
Here is one cards I did for the shows using the shapes designed to use with the letterbox kit.
I am not surprised it sold out as quickly as it did! I think the new shapes are marvellous.
I then coloured the mask and used a black micron pen to create the border around the mask. I added a shadow with a grey promarker and that was it.
Hope you enjoy the rest of the weekend
Happy Crafting
Jane xx
Here is one cards I did for the shows using the shapes designed to use with the letterbox kit.
I am not surprised it sold out as quickly as it did! I think the new shapes are marvellous.
I started off by cutting a piece of theuva card into a 12cm square and stamping the mask into the centre. I stamped the mask onto a post it and cut a bubble shape around it and positioned that over the mask stamped on the card.
I then used the 3 diamonds stamp to create the continuous background.
I stamped in black adirondack so I could colour with red yellow green and blue promarkers.
I chose these colours as I wanted it to look like a harlequin suit! It reminds me of a waistcoat that Colin has.
I mounted the topper onto a piece of black card then stamped a border onto the card blank and coloured it with the 4 colours of promarker and a gold pen. I then added the topper. I stuck small black gems at the corners of the diamonds.
I then coloured the mask and used a black micron pen to create the border around the mask. I added a shadow with a grey promarker and that was it.
Hope you enjoy the rest of the weekend
Happy Crafting
Jane xx
Tuesday, 1 October 2013
Winter Bbrrr!!!
Well I suppose it has to come sometime but it's only Winter on the Clarity Blog Challenge! It seems a mile away when you look at the sunshine outside as I write this but it will soon be here according to the weather forecast! I do hope it is'nt as bad as they say! Blog challenges may be the thing to do on the darker evening and in the safety of your warm house
Last month we saw some amazing entries for Vintage. Lets hope this month we see you create plenty of wintery Entries. And remember a winner will be chosen at random so its worth having a go as there is £50 of Clarity Vouchers at stake! So the Challenge this month is Winter.
Here is my project that can be seen over at the Clarity Challenge Blog.
I thought I would use a snow globe I had bought form Home Bargains! It would only have cost me about £1.50 to buy. It had a removable bottom and you are supposed to use it to put photos in. I took the label out and used that as a template for the size of card I needed and cut two pieces of theuva card to the correct size. I then created two scenes using the Snowscape stamp and the Winter wonderland stamp set.
I used Denim Adirondack ink to do the stamping. I added a bit of glitter to the snow flakes and once I had done both pieces of card I then inserted them into the globe and sealed the bottom. The globe makes the scenes look bigger than they actually are! Here is a picture of both sides.
I think it makes a nice decoration to have out over the christmas period and could be left out until the spring!!!
Its worth keeping you eyes open in shops!
Thanks for dropping by! Please leave me a comment then pop back to the blog challenge and look at the other fabulous projects made by the rest of the design team ....and there are some new names for you to see this month!!
Happy Crafting
Jane xx
Sunday, 29 September 2013
Good bye September
Well here we are at the end of the month and outside its Brilliant sunshine and quite warm by day! I realised I had not blogged all my cards from the last clarity weekend which was at the start of this month so I am just going to put them on here for you now!
Firstly this one featuring the 3 kings set.
I started off cutting baubles using a spellbinders set and used white and purple embossing powder.
On the larger bauble I stamped the music ramdomly and then heat embossed in black sparkle wow powder.
This one was my attempt to combine the christmas sets and create a Nativity scene.
After all the christmas stamps we had been given recently it came as a refreshing change to get other things to work with including some stencils of the tree scape.
So out came the gelli plate and Backgrounds were created!
I then used them with different stamps to create different cards.
This one I made an aperture and then stamped the cottage and trees to create a cottage in the woods scene.
I did like the softness to the colours on this one.
Ducks and trees were the order of the month and so I made another treescape print on th eGelli plate but this time no aperture. I then stamped the ducks onto Theuva card and coloured them in with promarkers. I cut them out. The sentiment that came with the ducks I stamped onto another piece of card and made a banner out of it. I blended some ink round the edge of this so that it did not look too stark when it was put on to the picture. I used two brads in the banner to make it look more authentic.
My idea was that the ducks were flying out of the forest in search of the lake!
I was pleased how the two stencils had lined up quite well and I had used Barbara Gray's tip of putting a piece of the card under the gelli plate to line everything up....how does she know these things!!
The next one with the ducks was done on a gelliplate back ground I had left over from making samples for Maria's show. I used the sapling trees and the ducks in the aperture. This time I stamped the sentiment and used a spellbinders label to cut it out. I then drew round the die onto the card I had got from creating the aperture to make the mat for it.
The grasses are one of the spellbinders delites. Round the outside of the card I blended ink then wrote then words quack quack and joined it all up with a wiggly line to finish it off.
The next one I made was using the silhouette ducks and the sapling trees. I stamped and embossed the trees and ducks in black. I made sure I had used an anti static bag before I did this so to avoid unwanted black dots. I then used brushes to blend ink around the edges bringing in to the centre but leaving the very centre white.
I used mustard seed first then spiced marmalade to get the really depth of colour I wanted.
The next two were using the next classroom stamps!
I love trees and think this helped when I got these stamps. I could have made many more samples but left it at just two. The first of these was to try and show how the seasons can change the look of a tree by using different colours of inks to represent the changing seasons.
The last card I did just popped into my head and is supposed to be a scene with a couple of big old trees in a field at sunrise or sunset which ever you want it to be!
I used the brayer to do the sky and make up sponge to do the hills and the sun.
I really enjoyed these stamps and could have made many more so they will be being used again in the future.
I hope you enjoyed looking at the cards and reading about them.
I would appreciate it if you could leave me a comment.
Happy Crafting
Jane xx
Subscribe to:
Posts (Atom)