Well last two cards form last months clarity Samples. I don't have a lot of time to give you all the deets but felt I needed to get them on today as the next shows are this weekend and then I will have even more to put on.
These were special cards. As Barbara was doing extra shows over the Clarity weekend starting on th eFriday she had asked the DT to help her out and do some demo set ups. These were my two. The first one didn't get used as the set of shapes for the letterbox kit sold out so quickly and not surprisingly really.
Here it is.
As you can see I had used the tags to create an advert for a Cake Sale. I had also used the miniture Kitchen set which I love and it makes the most adorable cards...large and small!
It took a lot of masking and I was grateful that we now have masks for the shapes as it saves so much cutting out. I had to make masks for the cakes but at least they are easy shapes to cut out.
The inks I used are Adirondacks - butterscotch and espresso
The next card was a bit more complicated and I was thrilled to see Barbara use this on on the telly and yes for those of you who saw it I was shouting instructions at her as I watched it!!!
I used clarity card for this and the cling film trick where you brayer the card with ink then spritz a piece of cling film with water and layer it over the card scrunching it up so you get lovely texture to your back ground.
I then let this dry and then stamped the fish and coral onto it. I coloured the fish and coral with promarkers. I also brushed ink through a piece of sequin waste to add bubbles.
Over the top of the card I put a piece of acetate that I had stamped the coral onto in black archival ink. Turn it over and colour the reverse with promarkers. That way the ink won't bleed. Attach the acetate to the clarity card using brads to make it look like a fish tank.
The backing paper is a piece of paper that I used to mop up the ink from my splodge mat. This meant it was the right tones to match my card.
I finished my card off with a fish embellishment.
And there you have it!
Happy Crafting
A little insight into my crafting world (and anything else I may care to add) Please kindly do not copy or upload any of my work claiming it to be your own. Many Thanks
Followers
Thursday, 31 October 2013
Tuesday, 29 October 2013
Sapling Trees and Cherries
Here are two more of my cards from last months clarity
This one uses the Sapling trees and mica powders.
It really is quite easy to do but does need a quick spray with cheap hairspray once it has been finished to help fix the mica powders
I even used the clarity masks to do the moon and the hils and mountains... was a bit strange using versamark with these as you can't really see what you've done until you apply the powders.
The base card also had versamark stamped onto it and then mica powder applied to create the background to the main topper.
The next card used a stencil and was really easy to do.
I placed the stencil on a piece of card cut to 19 x 19 cm and then brushed with ink. I darkened some of the areas. Then I removed the stencil and over the cherries I brushed some pink ink and green over the leaves.
I then drew freehand around the inked area and made a border colouring it with pencil crayons.
I mounted it onto a piece of pink card then onto a white card blank.
I added some flowers and there you go ! A nice quick and easy but I hope you agree effective card.
Have a lovely evening
Happy Crafting
Monday, 28 October 2013
Woody Woodpecker and Co
I need to share some more cards with you from the last Clarity Weekend
This time its the next classroom stamps that were briefly shown on the classroom show on Saturday. Its a woodpecker and flower stamp and with it is a stencil that could be a tree trunk but could be so much more.
The first card I made using the flower part. I stamped the image one way then turned the paper round and matched up the edge of the stamp so it gave a big floral centre piece So glad that you can see through the stamp I then stamped it again a couple of times onto some more smooth decoupage paper so that I could decoupage some of the flowers. I stamped around the edge of the card with the large sapling tree to get just the leaves on the edge of the card. I coloured it all in with promarkers.
The 8 X 8 blank card I used the corner of the stencil and brushed through it with lettuce adirondack to create the background . I mounted the topper onto black card then on to the card blank and finished it with a ribbon and some flowers. I decoupaged some of the flowers so it gave it a bit more dimension.
The next card I made using this kit was this one.
For this I used a double sided adhesive sheet and stamped the woodpecker to one side of it. I stamped the verse where I wanted it to go to look like the bird was clinging to it! I then covered it up with a piece of acetate.
I used a white pen on the reverse of the woodpecker to make his white bits stand out more and a red promarker for his head and under his tummy. I used a mixture of gilding flakes and mica powders to create the background to the wookpecker. I stuck the stencil on to the adhesive sheet to act as a guide and it seemed to work quite well. Its a good job the stencils are robust as the adhesive sheets are really sticky.
Once I had made the topper it was mounted on to black card and on to a plain white A5 card blank and finished off with 5 tiny black gems. I didn't think it needed anything else on it.
Thats it for today. I hope you enjoyed looking. Please let me know what you think.
Happy Crafting
Jane xx
Sunday, 27 October 2013
Bonnie Scotland
Good Morning to you all
I thought it was about time I put my other cards on my blog from last months Clarityathon. This time next week we will be in the mibble of the next lot of shows!!!
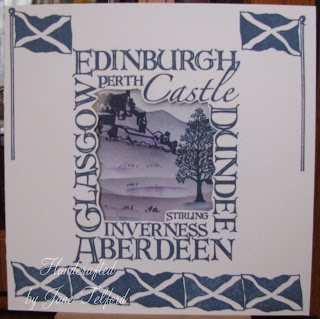
In honour of 'Our Barb' being in Scotland at the SECC I thought I would start of by blogging my Card using the Scottish stamp set. I added the deer scape and the large and small larch.
The front of the card I used just Denim Adirondack to stamp the frame with and used the flag and flag pole around it. I also cut an apeture in the frame and attached a piece of acetate to the back of it so it looked like a window.
In side the card I created a scene using the castle, the deerscape and the trees. I used denim and purple twilight adironacks to do this. My idea was that I wanted a moody picture and one that also had the flavour of heather on the mountains of the highlands!
Here is the front of the card.
Here is the inside
Colin said the whole card looked like an advert for the Scottish Tourist Board!!!
Anyway I hope you like it.
I am enjoying a relaxing Sunday finishing off next months samples and and happy in the knowledge that tomorrow I am on holiday!
Happy Crafting
Jane xx
Sunday, 13 October 2013
Oh Beehive!
Here is another of my samples from the Clarity Stamp Weekend. You did see this one on friday but the set was so popular you might have missed it!
This one takes us back to one of the early classroom shows when Barbara demonstrated how to create a Bee hive. As soon as I saw the shapes this one also popped into my head! I thought the hexagons would make a lovely background making it look like honey comb! I think it helped that I had been to the Harrogate Flower show recently and I am always fascinated by the Bee keepers Society that always have a stand there.
I started off by creating the beehive in the centre by cutting a mask for it from copy paper then inking through it masking off the sections to get the lines I then cut a little door into the inny bit and inked with espresson to create the bees way in.
I then stamped the hexagons for the words around the hive in butterscotch adirondack and masked them off. The new masks are fab for this.
I continued to stamp hexagons all around the edge of the card. I then used a stencil brush...the new clarity ones are fab! .....and brushed butterscotch ink around the outside edge to create a soft yellow colour. As I got near to the hive I stopped brushing to highlight the centre.
I then removed the masks from the hexagons and in espresso I stamped the letters to read BEE HAPPY. Then stamped the bees in place.
I mounted this onto dark brown then cream card. The card blank I stamped around the edge with the hexagons and bees but blotted first to get a softer colour and without reloading my brush I softened the white card before adding my topper.
Hope you like it and if you got the shapes set well done.....if you didn't I hope you get one soon! xx
Happy Crafting
Jane xx
Clearly a Clarity Weekend
Well its been a great weekend so far with Barbara Gray on the TV showing us all some marvellous tips and tricks in the art of stamping!
Here is one cards I did for the shows using the shapes designed to use with the letterbox kit.
I am not surprised it sold out as quickly as it did! I think the new shapes are marvellous.
I then coloured the mask and used a black micron pen to create the border around the mask. I added a shadow with a grey promarker and that was it.
Hope you enjoy the rest of the weekend
Happy Crafting
Jane xx
Here is one cards I did for the shows using the shapes designed to use with the letterbox kit.
I am not surprised it sold out as quickly as it did! I think the new shapes are marvellous.
I started off by cutting a piece of theuva card into a 12cm square and stamping the mask into the centre. I stamped the mask onto a post it and cut a bubble shape around it and positioned that over the mask stamped on the card.
I then used the 3 diamonds stamp to create the continuous background.
I stamped in black adirondack so I could colour with red yellow green and blue promarkers.
I chose these colours as I wanted it to look like a harlequin suit! It reminds me of a waistcoat that Colin has.
I mounted the topper onto a piece of black card then stamped a border onto the card blank and coloured it with the 4 colours of promarker and a gold pen. I then added the topper. I stuck small black gems at the corners of the diamonds.
I then coloured the mask and used a black micron pen to create the border around the mask. I added a shadow with a grey promarker and that was it.
Hope you enjoy the rest of the weekend
Happy Crafting
Jane xx
Tuesday, 1 October 2013
Winter Bbrrr!!!
Well I suppose it has to come sometime but it's only Winter on the Clarity Blog Challenge! It seems a mile away when you look at the sunshine outside as I write this but it will soon be here according to the weather forecast! I do hope it is'nt as bad as they say! Blog challenges may be the thing to do on the darker evening and in the safety of your warm house
Last month we saw some amazing entries for Vintage. Lets hope this month we see you create plenty of wintery Entries. And remember a winner will be chosen at random so its worth having a go as there is £50 of Clarity Vouchers at stake! So the Challenge this month is Winter.
Here is my project that can be seen over at the Clarity Challenge Blog.
I thought I would use a snow globe I had bought form Home Bargains! It would only have cost me about £1.50 to buy. It had a removable bottom and you are supposed to use it to put photos in. I took the label out and used that as a template for the size of card I needed and cut two pieces of theuva card to the correct size. I then created two scenes using the Snowscape stamp and the Winter wonderland stamp set.
I used Denim Adirondack ink to do the stamping. I added a bit of glitter to the snow flakes and once I had done both pieces of card I then inserted them into the globe and sealed the bottom. The globe makes the scenes look bigger than they actually are! Here is a picture of both sides.
I think it makes a nice decoration to have out over the christmas period and could be left out until the spring!!!
Its worth keeping you eyes open in shops!
Thanks for dropping by! Please leave me a comment then pop back to the blog challenge and look at the other fabulous projects made by the rest of the design team ....and there are some new names for you to see this month!!
Happy Crafting
Jane xx
Subscribe to:
Posts (Atom)