Followers

Wednesday, 28 June 2017

Water and Bubbles ......On Parchment?

Good Afternoon all and welcome!
I really should blog more I know but I really don't seem to find the time. How I ever fit work in is beyond me entirely.
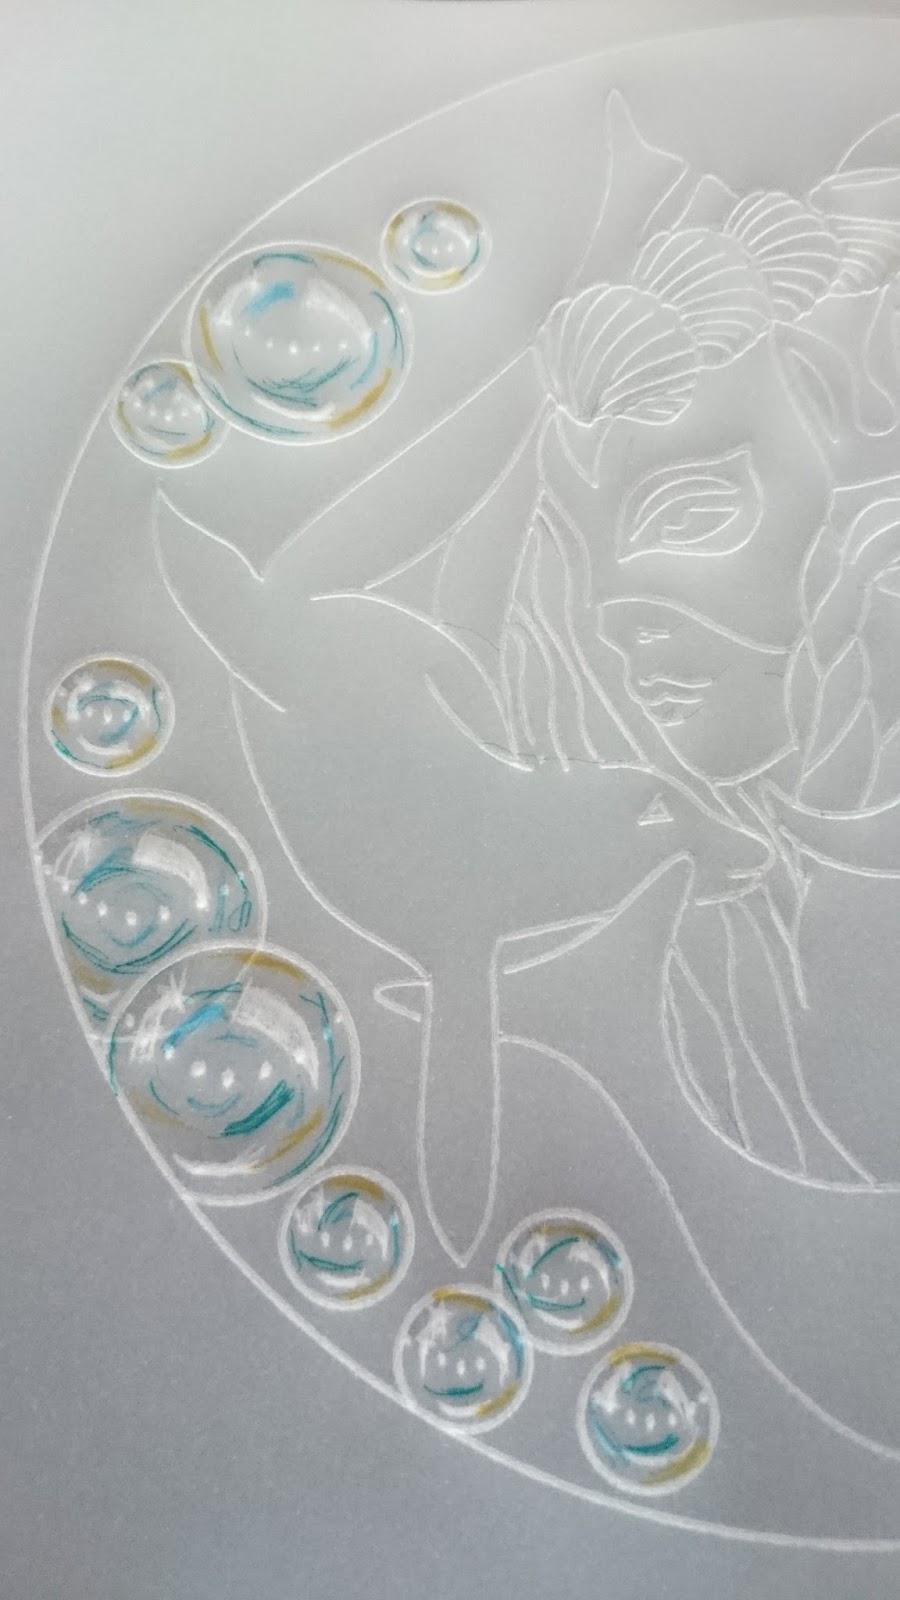
Anyway I thought that I would take the opportunity to blog how I made the bubbles on the sample that Maria used in one of her recent shows.
In her demo Maria didn't do the bubbles on the top part but said that if people wanted to know how I had done them then to ask me to blog it. A few people have asked me so here it is!


I started off by embossing the full water element image from the groovi plate. Then added the circle but only adding it part way to meet up with the dolphin and whale.


I then used the smallest two circles on the nested circle plate to make the bubbles in the empty space


I could have just coloured them like I did on the bottom layer of the card but I wanted them to look more like 3D bubbles.
I loved how Amanda Branston does her bubbles and I had a go myself on card but I wondered if I could transfer that to parchment. Well on card you use white to get the first circle....already white on parchment. Real bubbles have reflections in them where they pick up light and reflect colours that are around them. The white areas will be done with some freehand white work and colours added using distress markers using colours I will use in the main image.

First the white work. I think what makes it look real are the little dots 

Back
Front


Now on the reverse add some colour. I used the fine tip end of the pens

back
Front

 Now to colour the rest of the image and add a little white work
Front once coloured


Close up of the bubbles


From this I then perforated around the design and then cut away the waste using my ringlock scissors.

The second layer was done by creating a frame with the nested square extension plate (6th and 7th sized square) then adding bubbles to the corners with the nested circle plate the colouring in on the reverse in Watery colours (blues and greens). I perforated around and cut away the waste then used a piece of the northern lights pare to mount it on using brads then onto an 8 x 8 card blank.

So there you have it ....water and bubble really can go on Parchment.

Let me know what you think please.

Happy crafting


Thursday, 11 May 2017

Rhyme-time Border! How I made it.

Hello all! 
Wow it's a long time since I came on here! And there was I thinking I would have all the time in the world once I retired ! Hahaha!

Anyway I thought today I would show show how I made the border that went on all the pages in my parchment alphabet book that was recently on Hochanda.
Here is the book and one of the pages.


As you can see I used the letters on the Groovi Nursery Rhyme plates by Claritystamp to create the border all around the page. 

It took me two goes to get it right but I think that I was lucky! I wanted to use the largest undecorated letter to do the border but quickly realised that this was not possible as it would have made a huge border and I didn't want my book that size!

So I started off attaching a piece of A5 parchment to the plate mate and then working on the back of the parchment emboss the largest square on the A5 Nested Squares using the number 1 tool. 


I wanted my border to have all the letters to fit round in a clockwise fashion so because I am working on the back I would have to do the opposite. So I decided to draw a rough plan of the border and work out how the letters would fit around the square.
Here is my plan. 


I kept this on my table as a reminder! 

Next I took the parchment off the plate mate and got the baby plate inset to hold the baby plates steady.

I then followed my plan starting with A in the bottom right hand corner on the reverse.

G in the top corner 

then fitted in the rest of the letters.They needed to be tight to one another so that they all fitted in.


This is what is should look like


 Now In the top left hand corner add the N 


Then refer to your plan to add the letters in between.
I added the H first then the ML and K as these are the biggest letters


You should now have two sides complete.


Next add the T to the final corner.

Follow your plan to add OPQRS (sorry not all my photos worked)


You now have the final letters to add. I added the Z first next to the A
This bottom part is a tight fit so some letters may overlap a bit.


You will now have a complete border of letters
I then brought the nested square back and relocated it on my border. 

I then embossed the fourth square in form the largest making sure I didn't go over the letters
 
You should now have an alphabet border to colour or emboss!


And if you want to do a book you need another 25!!!

Hope this helps those who wanted to know how I did it.

Happy Crafting!


Tuesday, 23 August 2016

Let's go to Africa!

Good Morning Bloggers. I am sorry I have been away for so long but I have been busy with so much going on that my blog has had to take a back step for a while! I keep promising myself that I will get it going again so maybe this is the start of things to come!
I now have a wealth of artwork to share with you but I thought we'd start by having a trip to Africa. This is a card I did for Barbara's July Show using the African and the Wee Africa set 1 and set 2 I also used the Wood press letters set to write the word Africa.

To do the background I started with some of Sheena's Stamping card and cut it to 7" x 7". I then used Spectrum noir Aqua tints in stripes across the page overlapping the colours so they blended a little. I spritzed it a little with water then sprinkled it with rock salt to create the blotchy affect. I left it to dry for about an hour to allow the salt to work it's magic. 
Once the card was dry I brushed the salt off it. The surface can feel a bit rough after this so I dust it with talc! Makes it smell nice too! 
I stamped the larger man in the corner then the trees and then positioned the smaller man stamp so it added depth to the picture. I added the letters of Africa then I added a shadow under each man using a pencil crayon and along the foot of the trees. I also put a little shadow under each letter. 
I matted it on to black card then onto a white card blank. 

I was pretty pleased with the overall look of this one! I think it has the African feel .....what do you think?

Let me know in the comments please.


Anyway I'm off to hang some more washing out and then have a cuppa! 
Have a great day

Happy Crafting

xx


Tuesday, 31 May 2016

Just Words( but more than that)

Well good morning! 
I finally got round to blogging and realised just how long it is since I last shared things with you! I will slap my wrists!
It's another lovely day here in Stockport. Blue skies and fluffy white clouds which I am glad about as we are having our roof done and part of it is still open to the elements. Hopefully today it will be almost finished and it can do what it likes then. I will be glad to get back to normal although to be honest I haven't had to deal with most of it with being at work.

Sunday is the next show on Hochanda for Claritystamp and Paul is doing two hours of groovi with some lovely new plates for you all! I just posted my samples to him this morning.
Today I have an assortment of samples using the Word chain alphabet which Barbara brought to you in April. They work so well with the word chains allowing you to write almost anything in really funky fonts.


 Hope you liked looking
Have a wonderful day whatever you are doing
Happy Crafting

Hugs 

Saturday, 27 February 2016

Border Music!

Good Morning!
Its cold  here but frost free and dry. The Sun is trying to peep out too so not a bad day. I thought I would blog before I get on with some secret stuff. Lots of lovely goodies are coming your way very soon! Yes I am teasing I know! 

Today I am sharing a card I did for the More Clarity Show on Hochanda with Maria Simms. I had spent the day with Maria before this show and had been lucky enough to see all the beautiful samples that the rest of the Groovi DT had sent to her. They always look fabulous on the TV but they looked even more stunning in real life! 

The card I am sharing is the one that had the border of the music stave on it. I started off by cutting a piece of parchment into a square and using the border plate with the double straight lines I made a border area to fill in. 
I then used the music plate with the wavy music stave to fill in that area making sure I didn't cross any lines over so it appears that some are in front of the others. I love how on parchment there is no masking!
In the blank space above the border I then used the sentiment border plate to write Happy Birthday. 
Next came the white work. I filled in the two lines with white work ...remember slowly and gently does it!  It is a lengthy process but believe me it's worth taking your time! ( and how does this girl know that?) 
After I had done the white work I used a pricking grid and pricked two straight lines on either side of the border and all the way round the sentiment. I snipped out the little crosses in the corners of the lines around the sentiment.
I then cut a piece of pink card to attach it to and used the corner punch. to attach the parchment to it before attaching it to a white card blank. 

I thought this was a bit different than the usual parchment cards and could easily be for a young musician's birthday. It looks good on any colour card although I favoured the pink ....obviously!


So off I go now to get on with my crafting. Hope you have a good weekend whatever you are doing!
Happy Crafting

xx


Sunday, 14 February 2016

Lawn and Flowers

Good afternoon and Happy Valentines Day to you!
It's been a bit manic here and tinged with sadness too as my Father in law sadly died on February 5th at the grand old age of 95. Colin and I will be travelling (weather permitting) up to Inverness this week for his funeral. So keep your fingers crossed that it doesn't snow too much up there.

This week is half term so I am having a lazy weekend, finishing samples for Maria's next show on Hochanda and getting the washing done too! Colin is busy in the garden with his Bonsai trees so we are both enjoying our hobbies this weekend!

The card I have for you today is one I did for Barbara's show on the 7th February. I used the Henna Groovi Border Plate,  Relatives & Occasions Groovi Border Plates,  Art Nouveau Groovi Border Collection, (I used Lawn for this card), the Groovi Border Plates 1 & 2 Set (Just the straight line) and the Circle Nested Groovi Plate 

I started off using a piece of A5 parchment by placing Lawn to one side. I then positioned the circle around her so that she was to one side of the circle. I then used the sentiments to write Happy Birthday Daughter in the circle.

I used the line on the borders 1&2 plate to draw a straight line all round and then added the semi-circles off the Henna Groovi Border Plate. In the corners at the bottom I picked out the flowers which are on the plate with Lawn.

I added colour using spectrum noir pencils on the back of the parchment. I pricked all round the line border and snipped it out using the parchment scissors. I then attached it to a piece of purple card using mauve brads. It seemed the make the colours pop even more on this colour. I attached this to a card blank and that was it done. Simple really but I think so effective. Do you agree?


Hope you are having a good weekend
Happy Crafting


Tuesday, 2 February 2016

A rose circle

Good Evening. 
This week has flown by and I have not had a minute to blog anything at all so I thought while tea is cooking I would sit down and share with you a card from the last show that Barbara did in in January on Hochanda. We had the Wee foliage set to use as some of the stamps being sold on the show and I wanted to do something a bit different with them. So I decided to make my own ink pad using distress re-inkers and a piece of Ranger Inkssentials Cut-N-Dry Stamp Pad. I stamped the rose on the pad in archival ink then added the colour using a paint brush to the areas I wanted red then green. I left it to soak in a bit then used it to ink my stamp and stamped a couple of times on spare paper to get the ink dispersed.
I then took a piece of theuva card and found the centre which I marked with a pencil dot. I then started to stamp the rose with the bottom of the leaves on that dot then turned the card one quarter turn and stamped it again until I had 4 roses in position. I then stamped in between each of these to create the circle. 
I used the word chains to do the sentiment Hugs & Kisses. I brushed a little bit of the red ink around the corners of the card just to take the whiteness off then matted it onto black then red then onto a white card blank. I added 4 gems to the corners and that was finished.


I was pleased with how this looked. I think it would be a nice Valentines card so might repeat it at sometime!

Have a lovely day and happy crafting.