Followers

Wednesday 8 July 2020

Life in reflection


Good afternoon all. I hope you are all well and coping with the latest advice from the powers that be. Who’s been for a haircut yet? I am going very soon.....can’t wait. My hair feels like a carpet as it’s gone so thick. Despite Colin and myself having a little chop at the length of it to stop me shaving it all off there is nothing like going to the hairdressers and letting her have a good old cut at it and thin it all out. It’s about 18 weeks since she cut it last so it definitely needs it.

Today I want to share with you a card I had made for the Claritystamp shows using the stamps designed by Linda Williams. I used the deckchairs set for this one and actually only used 2 of the accent stamps. The willow tree and the sun with a cloud. 
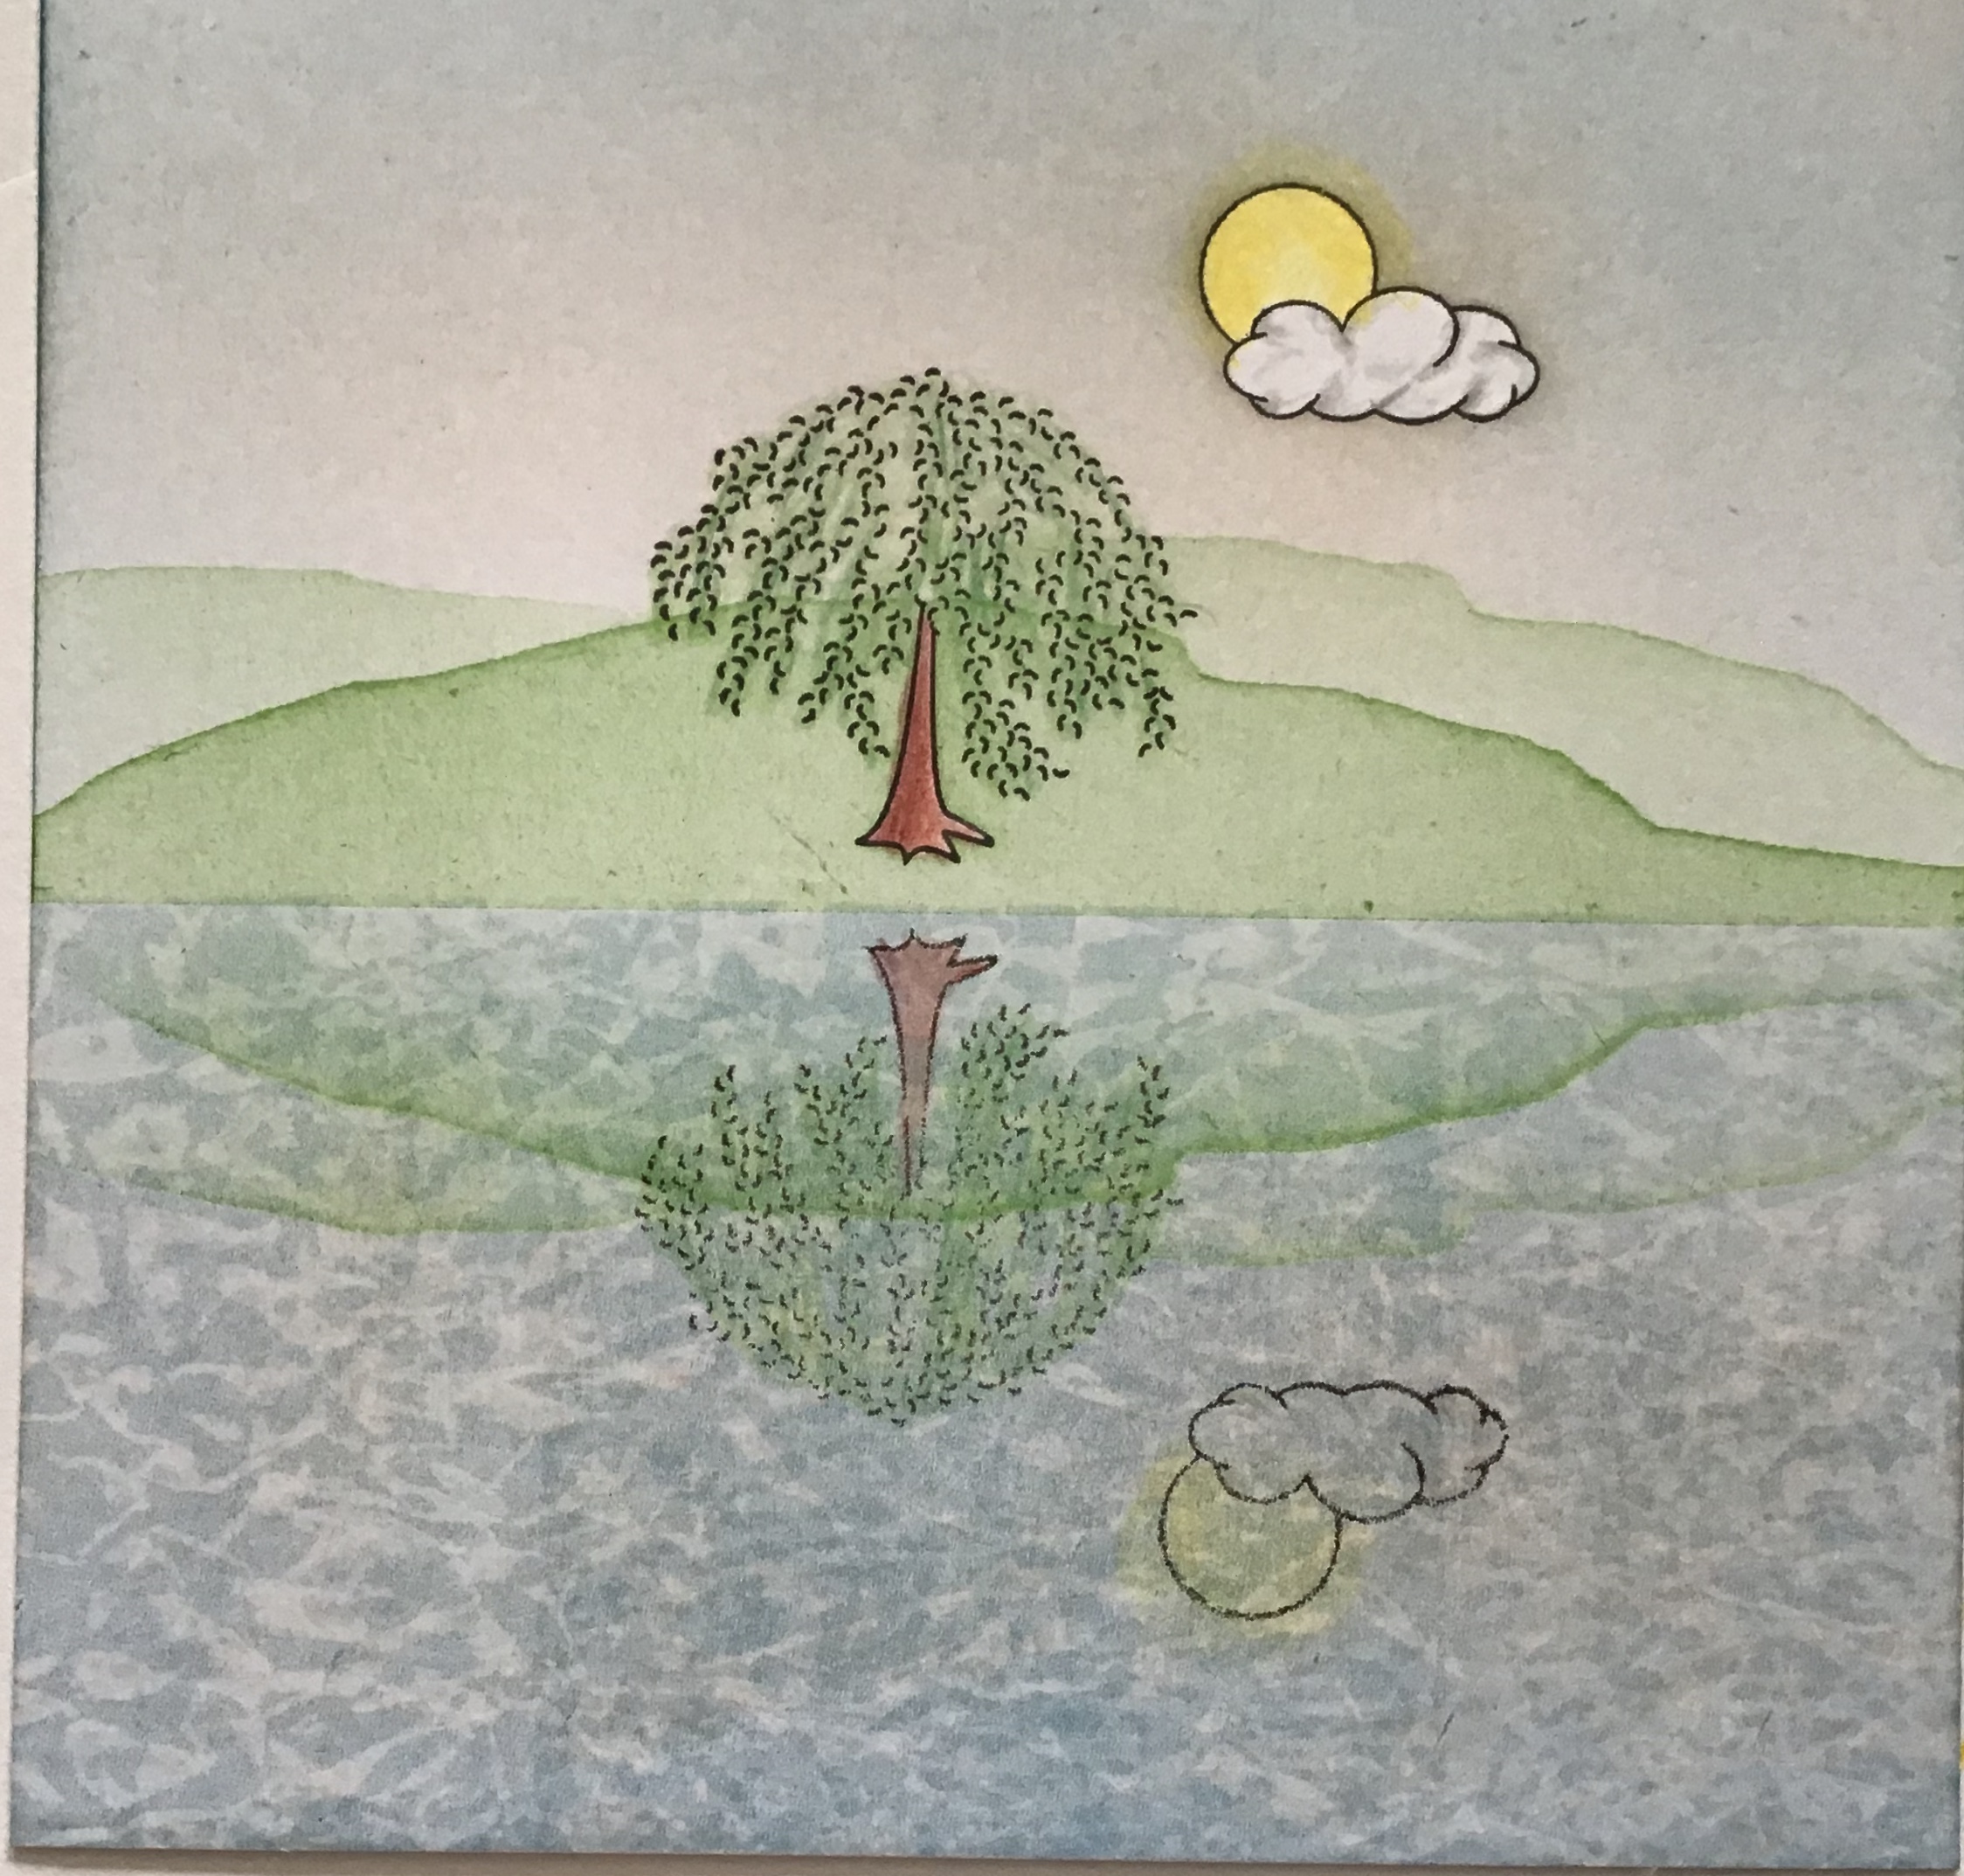
This is the card I am showing you.


I used Theuva Card to do this on and started off by cutting a piece to 13cm x13cm. 
You will need a piece of acetate, a mega mount and versatile ink. This dries more slowly than archival ink.
Arrange the stamps on the block how you want them to be on the image. Ink up the two stamps and carefully stamp onto the acetate being careful not to slide.
Leave the stamps in place on the block.


Turn this over so the inky side is face down and position it onto the card in the lower half but with the base of the trunk close to the centre.

Cover it with a piece of paper and press it firmly to transfer the image.

Don’t worry if it’s not all perfect as this is the reflection


Ink the stamps and stamp onto the top part of the card so it mirrors the image you did with the acetate.
 

Add the mask to the cloud in the top image. The reflection on does not need to be masked off.


Cover the top half of the card with masking tape and a piece of paper


Scrunch up a piece of paper a couple of times and you will need blue distress ink and a brayer 

Brayer some ink onto a blending mat so that the brayer has a nice even coverage. I used a mix of the two colours of blue.


Flatten out the paper but only so you can roll the brayer over it


Roll the brayer over the paper and you will get a pattern on the brayer.


Use this ink to brayer over the bottom half of the card. I brayered one way then back.


It should look like this. Don't over work it or the effect will go.


Move the paper and low tack tape so it covers the area you have just brayered.


Pick up some of the blue ink from the blending mat with an ink brush and brush around the card over the top of the tree and cloud. Leave the masks in place.


Tear a hill from a piece of copy paper and hold it in place as you brush with green distress ink to create a hill.
Use some masking fluid in the trunk of the tree.


Move the hill mask to create more hills. Then remove the mask form the bottom part of the picture. turn the hill mask over to that you can create the reflection of the hill in the water. Brush a small amount of green ink across the torn edge of the paper.

Brush a little amount of pale pink ink over the white areas of the sky and a little across the water.

Remove the cloud mask and the masking fluid. Add colour to the tree and sun with pencils. In the reflection the colours need to be paler.

Use a micron pen to draw a wiggly line around the edges and also along the centre line 

Mat on to black and then on to a 6 x 6 card blank.
Add a sentiment sticker.


Let me know what you think and also if you have a go.

Happy Crafting


Sunday 21 June 2020

Gel plate and parchment?

Good afternoon! Well just when you thought it was safe, here I come again with another project for you to perhaps have a go at. This combines a Gel press print and a bit of parchment …..not something that you often put together. 

Before that I thought I would share with you that it is 7 years almost to the day that Barbara asked me to be on her team. I tell you that you could have knocked me over with a feather on that day. Since I joined I think my artwork has developed and improved but I have certainly tried things that I would never have done without me being on the team. Parchment craft is definitely something that I know I would never have done without the Groovi system. 
I certainly have had an amazing journey so far with being on the design team and met so many people along the way some who I have become very good friends with. It's amazing that crafting can bring you all that.

Anyway enough waffle. Here is the project for this blog.


Ingredients. 
Leafy swirl stencil 
Dotty wave stencil 
Groovi border word chains 17 and 18 GRO-WO-41176-09 
Groovi border word chains 19 and 20 GRO-WO-41177-09 
Brown acrylic paint 
Gel Press


1. Brayer the paint onto a 6x6 gel press and add the leafy swirl stencil and the dotty wave stencil on top. Blot areas with copy paper. Remove both stencils and print on to stencil card. Leave to dry. 

2. Using a piece of parchment that is 21cm x 7cm emboss the sentiment in the middle of this. Colour on the reverse using a brown perga colour. Tear the top and bottom edges of the parchment and wrap this around the card at an angle Stick on the back with tape. 

3. Mat onto a piece of brown card and mount on a card blank.

You could change the look simply by using a different colour of paint.

I hope you have enjoyed the recent blogs. Please let me know what you think.

A stone wall with flowers on!

Good morning all.
An extra day at the Open day..... only virtually though and we'd not get that for real! SO lets make the most of it and enjoy the day! 

It's Father's Day today and we will be having a visit from Amy later....all socially distanced of course. How I wish we could have a proper hug. I know we will eventually but I want it now! 
I heard on the radio that we need be be hugged to survive. I am so glad I have my Colin to give me a hug when I need one. I don't know how I could manage otherwise.

Anyway I thought I would share with you a project I made as a sample last year. It's an inky one this time using the Lizzy & Rockery Stamp set. 


Ingredients.

Lizzy & Rockery Stamp set
Rockery masks
Sentiment stamp
Artistry inks. Blaze, black shadow and aged stucco
Sparkle pen


1. Working on stencil card stamp the stone wall so it overlaps the edge of the card. Mask and stamp again using the guideline to match it up. Continue to mask it until a complete panel is made. Remove the masks.
2. Use low tack tape to isolate the stone wall part and brush grey ink and black ink into the panel leaving the very centre light. Carefully remove the tape.
3. Reposition the stone wall masks and stamp the flowers along the length of it and overlapping the edges of the card. Remove the masks.
4. Put some red ink on your craft mat and pick it up with a sparkle pen to add colour to some areas of the flowers.
5. Stamp the sentiment in black archival ink. Edge the card with a black sharpie pen.
6. Mat onto red card then mount on a card blank.

Please let me know below what you think of this and if you have a go post your card in Clarity worldwide and tag me in so I can see it.

Happy Crafting 

Saturday 20 June 2020

Oh no! Not another Make and Take!!! 'Fraid so!

Afternoon peeps.
Are you having fun? I do hope so. 

Well why not have a go at this little project. And its easy to make it yours by changing the colours used and the main image can be changed too! 

I love these layering plates designed by Tina. So many different possibilities. They can be used for male or female cards too!

Any way here it is!


Flowers and butterfly
Ingredients
A5 plain parchment
Nested Square plate GRO-PA-40037-03
Tina's geo layering rectangles Occasions GRO-PA-41076-03
Tina's summer layering squares GRO-FL-41075-03
 A5 square plate Mate
Blendable Pencils
4 brads
Designer paper cut to 16cm²
7x7 card blank

1. Create a frame by embossing the largest square of the nested square plate using the No.1 tool.

2. Change to the geo layering plate and emboss the band at the bottom of the square. Then add the band up the right hand side (This will come out on the left when it is the right way round.)
3. Use the geo layering plate to add the fine line around the top left corner.
4. Emboss the square design in the centre of the remaining space. You can change the design or choose one directly from the plate.
5. Emboss the remaining border as shown in the design.
6. Emboss white work in small areas using the No.3/4 tool.
7. Add colour on the reverse using the Pergaliners. Choose colours that compliment the paper you have been given.
To finish this
Trim around the frame with a paper trimmer or perforate and snip
Attach to designer paper with mini brads
Mount onto a 7x7 card blank.

I hope that if you have a go at this project you will post your results in Groovi or Clarity Worldwide and let me know what you thought of it.
Happy Days Clarity Days


Another Virtual Make and Take

Good Morning all and welcome back to the Make and Take table. I thought today we would make a Christmas Card...it is over half way through June you know! Actually it's 188 days from today so if you are going to make all your Cards from Parchment now is a great time to start. Haha!
There are a lot of lovely plates to choose from but I used Tina's Christmas baubles. There are so many lovely designs on that plate and opportunities to change the designs and do grid work in the shapes.

The was first done at the Open Day in Leyburn 2018 and I know that quite a lot of people who did it there enjoyed it even though it was a bit more of a challenge to get the frame right. 

I hope you have a go at this one and if you don't have the plates I used see if you can just use it as inspiration.  


Merry Christmas Baubles
Ingredients
A5 plain parchment
Tina's Christmas Baubles GRO-CH-41009-15
Occasions Border plate  GRO-WO-40060-09
Border plate Mate
Blendable Pencils
Blender tool and nib
Dorso oil
White pen
4 brads
Designer paper cut 14½cm²
6x6 card blank


1. Create a frame using the bauble border. It should be 12 sections on each side.
(Tip: Start at the short edge of the parchment and emboss 12 sections, turn and line up with the last square then emboss a further 11 squares. Continue round until you have a frame.)
2. Add the circles in each corner square and the mini baubles in the rest of the frame.
3. Add a piece of the border across the aperture from top left corner to middle right side and fill with mini baubles.
4. Emboss the baubles of your choice ( one must have a plain circle in it if you want a gem)
5. Change to the border plate and add the sentiment.
6. Emboss white work in small areas.
7. Add colour on the reverse. Turn the parchment over and colour a faux gem on the front if wanted.
To finish this
Trim around the frame with a paper trimmer or perforate and snip
Attach to designer paper with mini brads
Mount onto a 6 x 6 card blank.

I you have a go please post your card on Groovi or Clarity Worldwide so we can see how you got on.
Happy Days - Clarity Open Days


Friday 19 June 2020

Happy Days - Clarity Open Days. A virtual Make and Take

Good Morning all. 
How are you all feeling today? Well I hope.

Today should have been the first day of the Claritystamp Open Day at Ditton. I was due to go to help with the Make and takes but obviously that's not happening now. However there is a virtual open day that Barbara and her team are going to be doing so I thought I would blog the Make and Take projects that have been done at past Open Days in Leyburn (oop norf). The Make and Takes are always so busy and get booked up really quickly but in the virtual world there is no queuing and plenty of chairs for every one. 

I know some of you will have done this one but not everyone will. 
This is a pretty simple one but I know that a few of the more experienced Groovi lot will love to add your own spin on things so please feel free.  

Enjoy your Virtual Make and Take.

Ingredients
Nested square - GRO-PA-40037-03
Jayne's Dahlia Name plate - GRO-FL-40390-03
Mountains and hills plate - GRO-LA-40007-03

1. Emboss the square frame using the 1st and 4th largest square on the nested square plate.
2. Emboss the Dahlia in the frame at an angle and on the right hand side.
3. Emboss the butterfly and the word.
4. Emboss the decorations in the frame.
5. Emboss the mountains avoiding the flower and butterfly
6. On the butterfly using the No. 4 tool emboss the body and dots.
7. Add some colour on the reverse using perga liners.
For the Dahlia I used yellow, orange, dark orange and green
For the Butterfly Purple and blue
Mountains- purple and tones of green . Use the side of the lead and do this very lightly and rub with blending tool nib to soften the pencil lines. If you have dorso oil a little of this helps too.
To finish this
Trim around the frame with a paper trimmer or perforate and snip
Attach to designer paper with mini brads
Mount onto brown card then onto a card blank. 

Please post your version on Groovi world wide so we can all see how you get on.
Thanks for reading and watch out for more to come.